
iOS Mobile Browser Extension
iOS Safari Extension Documentation
Revisions:
| Version | Details | Date | Author |
|---|---|---|---|
| 1.0 | Initial Release | 27/04/2022 | SB |
| 1.5 |
| 05/08/2022 | SB |
| 1.6 |
| 11/10/2022 | SB |
| 1.7 |
| 31/10/2022 | SB |
| 1.8 |
| 20/01/2023 | SB |
| 1.9 |
| 23/01/2023 | SB |
| 1.9.1 |
| 02/06/23 | EL |
| 1.9.5 |
| 09/06/23 | AT |
| 1.9.6 |
| 03/07/23 | AT |
| 1.9.7 |
| 10/07/23 | AT |
| 1.9.8 |
| 01/08/23 | AT |
| 2.0.0 |
| 24/11/23 | AT |
| 2.0.1 |
| 06/02/24 | AT |
| 2.0.2 |
| 16/02/24 | AT |
| 2.0.3 |
| 23/02/24 | AT |
| 2.0.4 |
| 29/02/24 | AT |
| 2.0.5 |
| 23/04/24 | AT |
| 3.0.0 | PopUp Redesign Customisations | 23/10/24 | HB |
| 3.0.1 | Optional Offerwall feature | 05/11/24 | AT |
| 3.0.2 |
| 21/11/24 | AT |
| 3.0.3 |
| 22/11/24 | AT |
| 3.0.4 |
| 11/12/24 | AT |
| 3.0.5 |
| 23/01/25 | AT |
| 3.0.6 |
| 13/03/25 | AT |
| 3.1.1 |
| 30/05/25 | AT |
| 3.1.2 |
| 15/07/25 | AT |
| 3.1.3 |
| 07/08/25 | AT |
| 3.1.4 |
| 21/10/25 | AT |
| 3.1.5 |
| 17/12/25 | AT |
| 3.1.6 |
| 08/04/26 | AT |
Prerequisites
- You must have Xcode installed (Tested on version 13.0)
- An existing iOS application
Getting Started
Follow these instructions to add the Kindred iOS Safari Extension to your existing iOS application.
For any questions or support with your integration, or to receive your API details, please contact [email protected]
- Down the Xcode Kindred Safari Extension template
- Navigate to your Xcode folder:
- Open new Finder window. Then go to Go -> Go to Folder and type
~/Library/Developer/Xcode

- Create a new folder called
Templates - Copy across the
Kindred Safari Extension.xctemplateto your newly created folder

- Open your Xcode iOS project
- Select File -> New -> Target
You should now see the Kindred Safari Extension under templates

- Create a new Kindred Safari Extension
- Update the name and description of your extension
You can update the name and description from the file /Resources/_locales/en/messages
- Update the required logos
Update the logos found in /Resources/icons
-
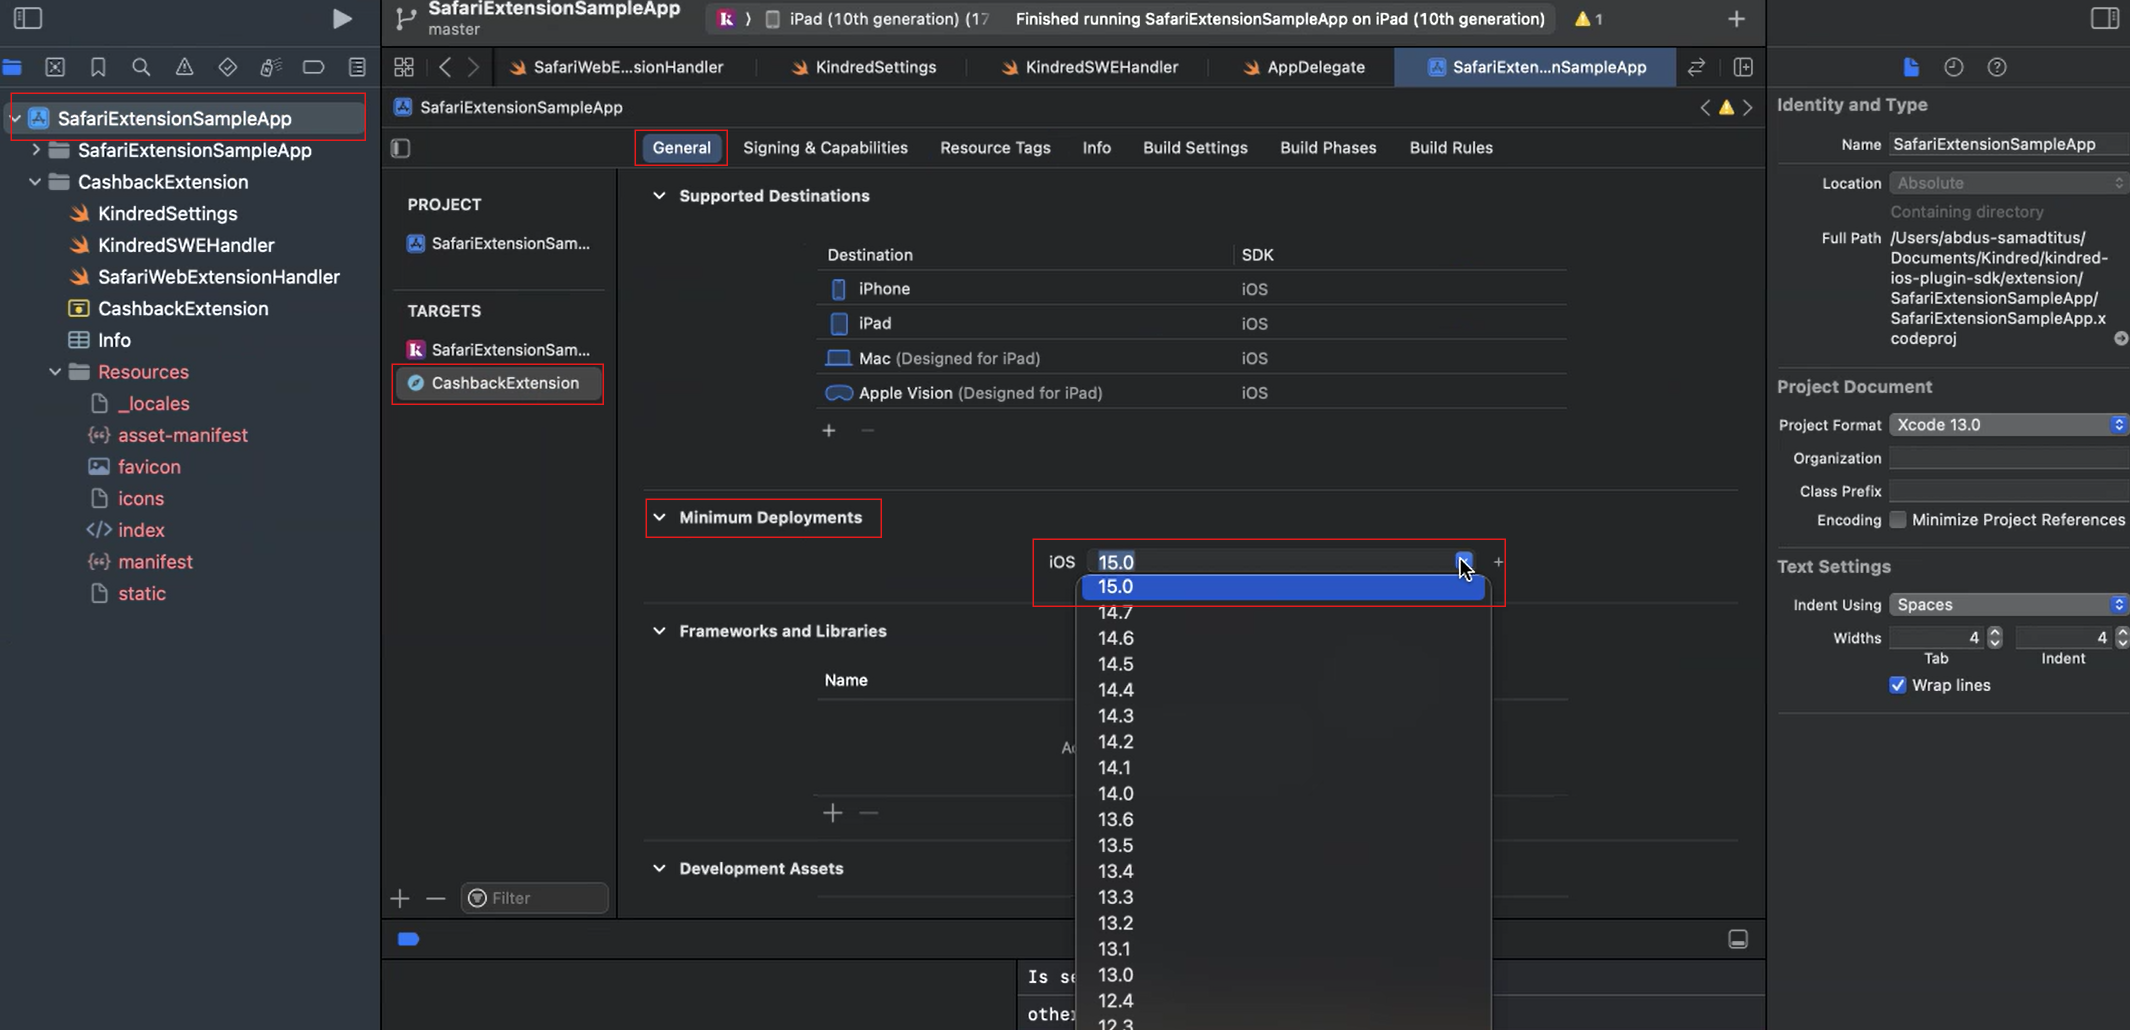
Configure the minimum IOS deployment version. The minimum ios version currently supported by the extension is 16.0 - This is the minimum IOS version the extension would work on.
To set this follow the steps below:Click on your application in the top left corner under the project files tab.
- Open your project in Xcode
- Select the extension under targets
- Select the General tab
- You should see a section called "Minimum Deployments", please select the appropriate version from the dropdown.
-
Set your Kindred credentials
Open the
info.plistof your extension, and set your Kindred credentials. Note, you need to set your CLIENT_ID, CLIENT_SECRET and SHARED_KEY.To get your Kindred credentials, please contact [email protected].
-
Setting the user ID (optional)
The default configuration gives each user a unique user ID. If you wish to provide your own user ID or a unique identifier for the user for analytic purposes, you can make the relevant updates on theSafariWebExtensionHandler.swift. Provide the SDK with you own unique ID as follows:
KindredSettings.shared.saveSetting(obj: userId, key: "KKUserId")- Post Purchase CTA (optional)
Once we track successful transactions for the user, we present them with a popup that has a call to action back to the app. In order for this to function, you must provide us with the url scheme you have set for your app
KindredSettings.shared.saveSetting(obj: "kindredsafariextensionsampleapp", key: DataKey.KKAppSchemeKey)To learn more about URL scheme, please visit: https://developer.apple.com/documentation/xcode/defining-a-custom-url-scheme-for-your-app
- Detecting if the extension was installed
NOTE: You will need to follow the steps for enabling the App Groups in order to use this functionality.
One thing you may need to know is if your users have activated the extension. This is possible by using the following method:
KindredSettings.shared.IsExtensionFirstTimeInstall()This will return either a true or false value.
Note: Due to the nature of the iOS Safari Extension, it is not possible to know whether the user has deactivated the extension. This method only indicates whether we have recognised if the extension was activated for the first time.
Troubleshooting: Whilst testing, if you notice that the value is retuning back false when you know it should return true, one thing to make sure is configured properly is the Apple App Group. In order for the Extension to communicate with the App, is through UserDefaults using the app groups. App Groups allow the extension and the app to create channel of shared data, and we use that to communicate between the extension and the app.
As described above, we cannot directly determine if a user has deactivated the extension, however we have developed a technique that allows you to understand the recently active population of users. Implemented as a function that can be called within your app, it will return true if the extension has been seen in the past 24 hours, or false if the extension has not been seen. The method for this is as follows:
KindredSettings.shared.isExtensionActivated()- Turning on analytics
If you would like to analytics tracking turned on, you can callself.setUseAnalytics(enabled: true)within theSafariWebExtensionHandler.swiftfile. This allows Kindred to track analytics on the following:
- Extension installation and enabling
- Latest activity
- Deal activations
- Conversions
NOTE: If you would like to opt in to analytics, you will also need to contact Kindred to ensure that your account is configured for analytics. Contact [email protected]
- Additional configurations (optional) located in the
SafariWebExtensionHandler.swiftfile.
Earthmark logo
If you do not want to see the earthmark logo within the extension, you can set this value to false.
self.setShowEarthmark(enabled: true)Setting custom user location
By default we get the users location based on there locale. However if you need to hardcode the country code to a specific country, you can modify this line, and hard code your country code instead of using the locale eg: let country = "US"
let country = locale.regionCode ?? "US"Setting custom currency
By default we get the users currency based on there locale. However if you need to hardcode the currency to a specific one, you can modify this line, and hard code yourcurrency instead of using the locale eg: let currency = "USD"
let currency = locale.currencyCode ?? "USD"Setting auto-coupons limit
This disables the auto coupons functionality on a site if that particular site exceeds the specified number of coupon codes. By default this logic is commented out and auto coupons will run on all sites.
To set this limit go to the SafariWebExtensionHandler.swift file and uncomment the following code and add in your desired limit:
 // Opt in for disabling auto-coupons on sites above specified code limit
 self.setAutoCouponsDisableLimit(limit: 10)
Default Expanded T&C
This config allows you to have the expandable t&c’s component with in certain popups in an expanded state by default. This config is disabled by default and the user would need to click to expand the t&c’s text.
To enable this config uncomment the following code in the SafariWebExtensionHandler.swift file
// Opt in for having the coupons terms and conditions expanded by default on the popups
self.setHaveCouponsTermsAndConditionsExpanded(enabled: true)
Custom button on coupons listing popup
This is a custom button that will appear on the coupons listing popup and can be configured to either open a url of your choice or navigate back to your app.
The code is commented out and this button is not enabled by default. To configure this button, you would need to navigate to the SafariWebExtensionHandler.swift file and uncomment and modify the below code.
 // Set custom button properties for coupons listing button
 let buttonProperties = CustomButtonProperties(isActive: true, type: "BACK_TO_APP", ref: 							  "kindredsafariextensionsampleapp")
 KindredSettings.shared.saveSettingObj(buttonProperties, key: DataKey.KKCustomButtonProperties)
The isActive property can either be set to true or false and this will enable/disable the button.
The Type property can either be set to “BACK_TO_APP” if you want to navigate back to your app or “WEB” if you want to open a custom url. The ref property can either be set to your app scheme if you’ve set the Type to “BACK_TO_APP” or can be set to a url of your choice if the type property is set to “WEB”. When setting the url make sure to include the full url eg. “https://example.com”.
Setting bar/roundel default preference
This config allows you to set the default popup preference i.e either bar/roundel. If the user has not yet made there own choice in the extensions settings, we default to the preference set in the config below. Please note that the preference you pass in can only be "bar" or "roundel".
 // set default preference for bar vs roundel ("bar" or "roundel")
 self.setDefaultPopupPreference(preference: "bar")
Verify the integration
You can verify the solution by running the app on the simulator.
-
Open Safari
-
Navigate to https://sdk.kindred.co/plugin-activation
-
Follow the instructions in the screen
-
visit your favourite brands
Try visiting Nike, Adidas or John Lewis
Activation Call-To-Action
On your onboarding journey, you can direct the users to a Kindred hosted page with instructions on how to activate the iOS mobile browser plugin.
The plugin activation page is: https://sdk.kindred.co/plugin-activation
If you would like to make use of our callback that redirects the user back to your app once they're done activating the plugin, you can pass a query parameter origin with the value of the URL scheme of your app.
https://sdk.kindred.co/plugin-activation?origin=YOUR_URL_SCHEME
For example, if your url scheme is kindred:// then you will use the link https://sdk.kindred.co/plugin-activation?origin=kindred
To learn more about URL scheme, please visit: https://developer.apple.com/documentation/xcode/defining-a-custom-url-scheme-for-your-app
Updating the iOS Safari Plugin
Firstly, ensure that you keep a copy of any customisations or configurations you currently have as these files will get replaced when updating the extension. Ensure that you have a backup of your configurations and customisations which you will need to re-add into the following files after updating them. Commonly modified files include, but are not limited to:
static/css/styles.css - this file contains your styling preferences
static/js/variables.js - this file contains your custom images as well as your custom text
SafariWebExtensionHandler.swift - this file contains any configuration you may have added or enabled/disabled.
To update your iOS Safari plugin, follow these steps:
- Download the latest version of the iOS Safari Plugin
- Extract the zip files
- Open your finder (Mac) or file explorer (Windows) to view the content of your Safari Plugin from your App Solution
- Copy the following content of the new version over the content of your plugin files (replace)
- _locales
- asset-manifest.json
- favicon.ico
- icons
- index.html
- KindredSettings.swift
- KindredSWEHandler.swift
- manifest.json
- SafariWebExtensionHandler.swift
- OfferWall.swift
- static
- Note, the file
TemplateInfo.plistis excluded from being copied. This file does not need updating. - After you have copied and replaced all the files over to your project, please ensure you follow the steps above to ensure that you have correctly configured your extension.
- Follow step 1 to 3 to make sure you have the latest version included in your Xcode templates
App Group Configuration
- You will now need to set up app groups within your Apple developer account.
To create a new App Group, do the following:
- Visit Apple's iOS Developer Centre, open your Account and log in.
- Select Certificates, IDs & Profiles.
- Under Identifiers select App Groups and click the + button to create a new group.
- Enter a Name and an Identifier for the new group and click the Continue button:
- Click the Register button to create the group and the Done to return to the list of registered App Groups
- Now, back in Xcode, go to the Project Navigator -> Select your applications target -> Head to the Signing and Capabilities tab -> Click the + button and search for groups. Add an App Group.

Important Note: Repeat this step for your Safari Extension target.
- Head to your application info.plist and add a key for AppGroupName with a string value matching the group name you created in step 1.
- Now head to the plugin extension info.plist and add a key for AppGroupName with the same string value as steps 1, 2 and 3.
API Declaration
As of May 1, 2024 Apple requires all apps that make use of APIs that require reason to declare it on their apps privacy manifest. Below are steps to add/update your privacy manifest with APIs used by the Kindred Extension.
-
Open Your Project in Xcode:
Launch Xcode and open your project.Choose File > New > File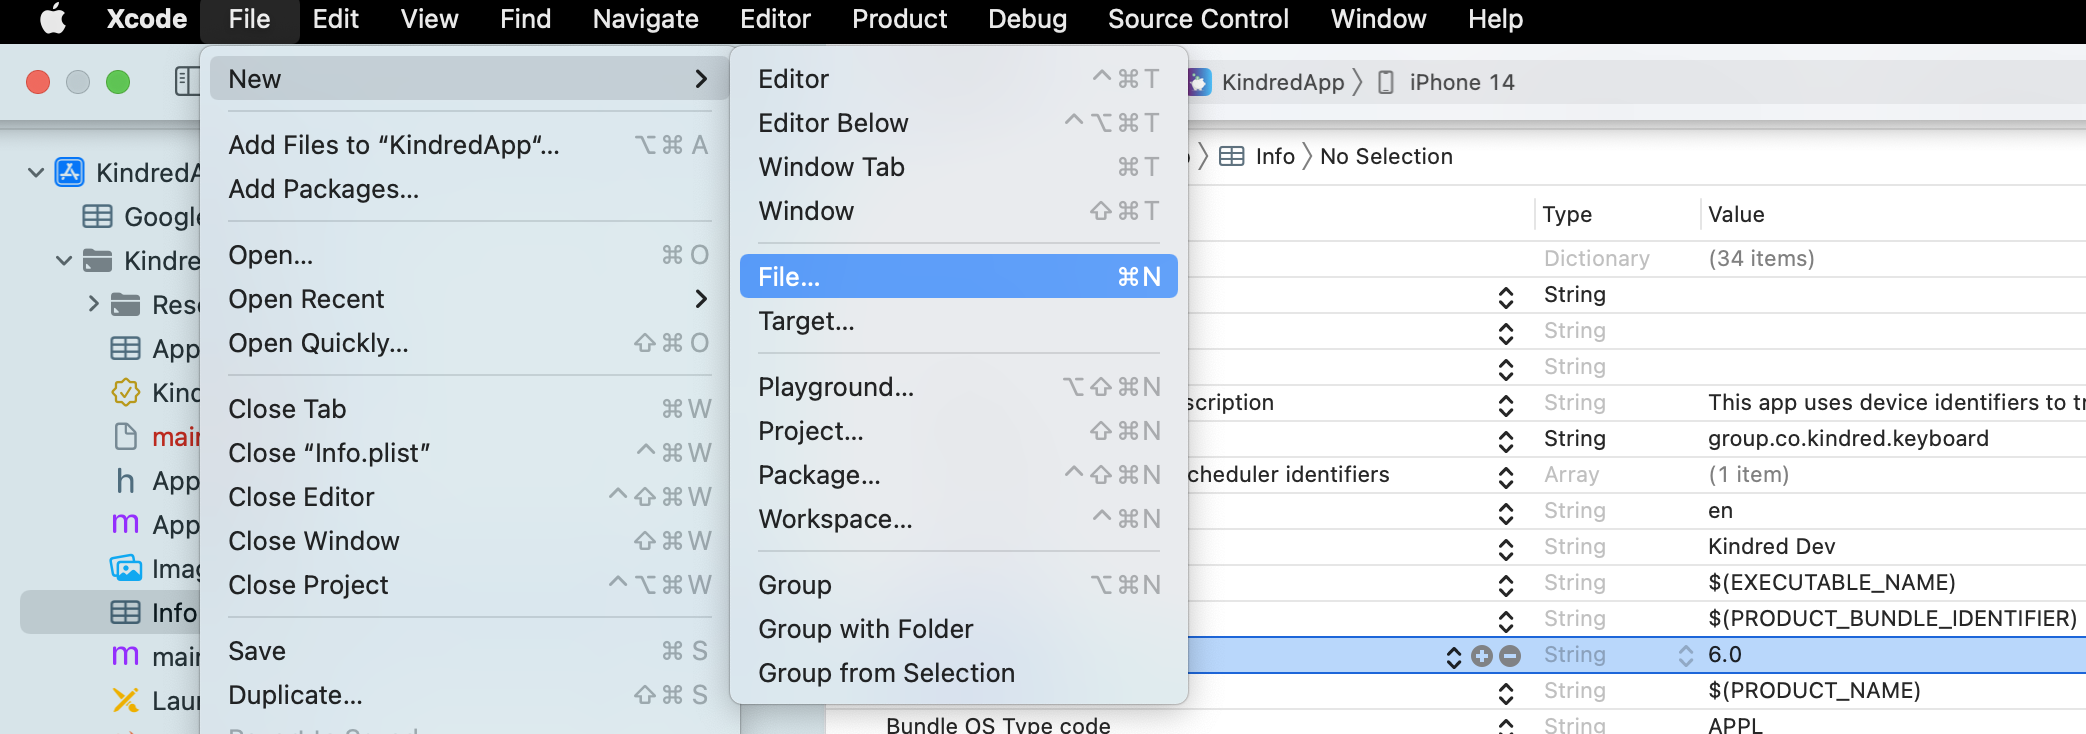
-
Scroll down to the Resource section, and select App Privacy File template.
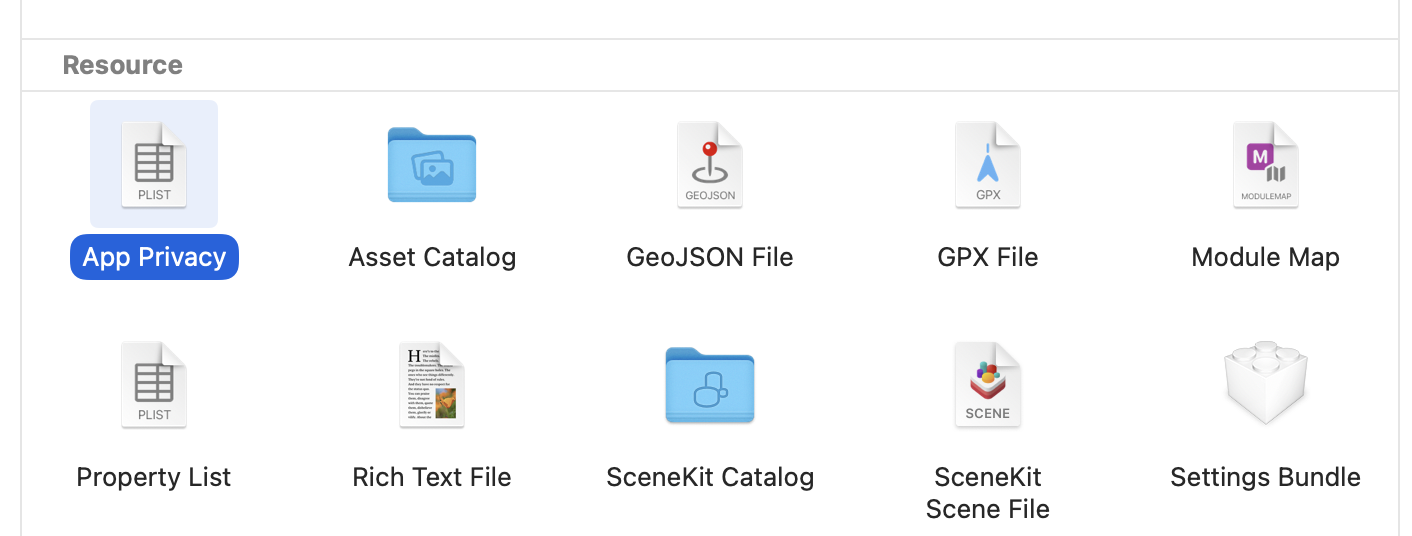
-
Click Next , and make sure the target is set to your project and the Kindred extension. Click create
The file is named PrivacyInfo.xcprivacy this is the required file name for bundled privacy manifests.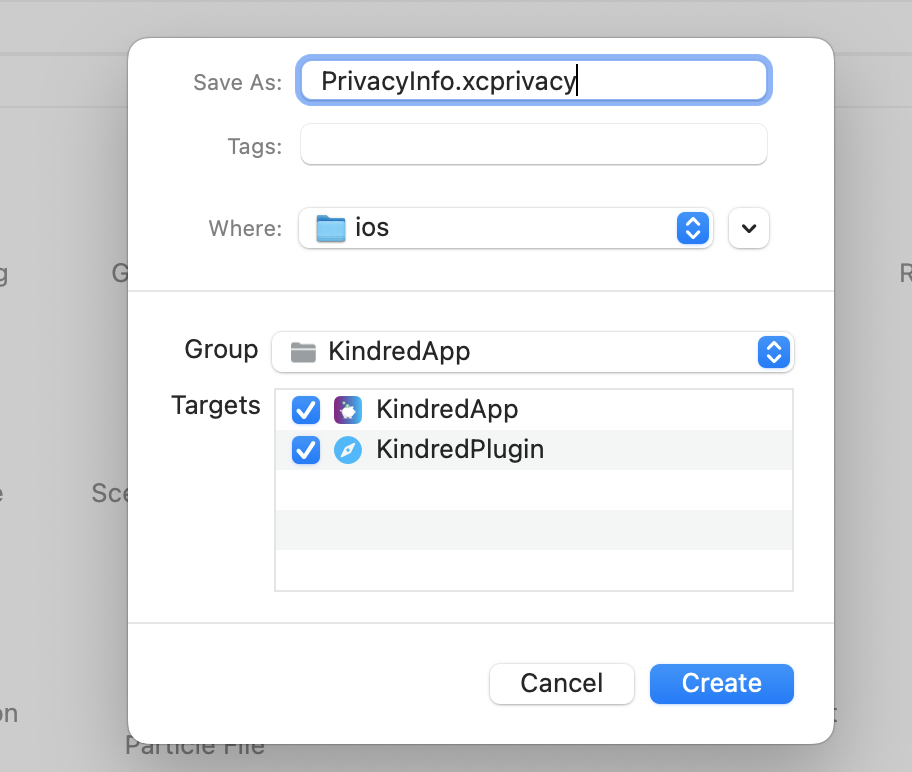
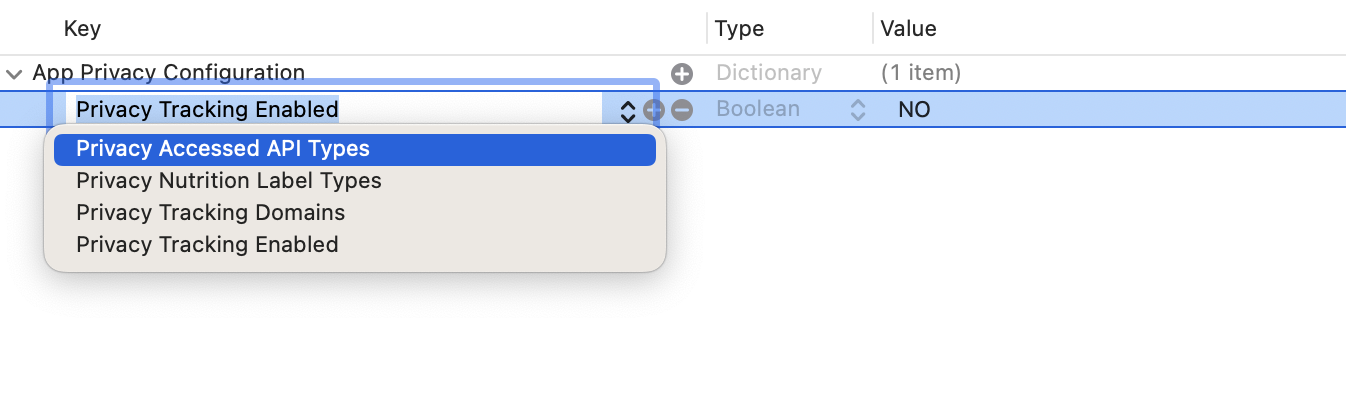
-
Add NSPrivacyAccessedAPITypes Entry :
Highlight an existing entry, then click the "+" button to add a new entry.
Type NSPrivacyAccessedAPITypes or Privacy Accessed API Types , and it will be set as an Array.
-
Configure the API Type and Reasons:
Expand NSPrivacyAccessedAPITypes and add a new Dictionary item inside it.
In the Dictionary, add a key NSPrivacyAccessedAPIType with the value NSPrivacyAccessedAPICategoryUserDefaults or User Defaults. Add another key NSPrivacyAccessedAPITypeReasons as an Array.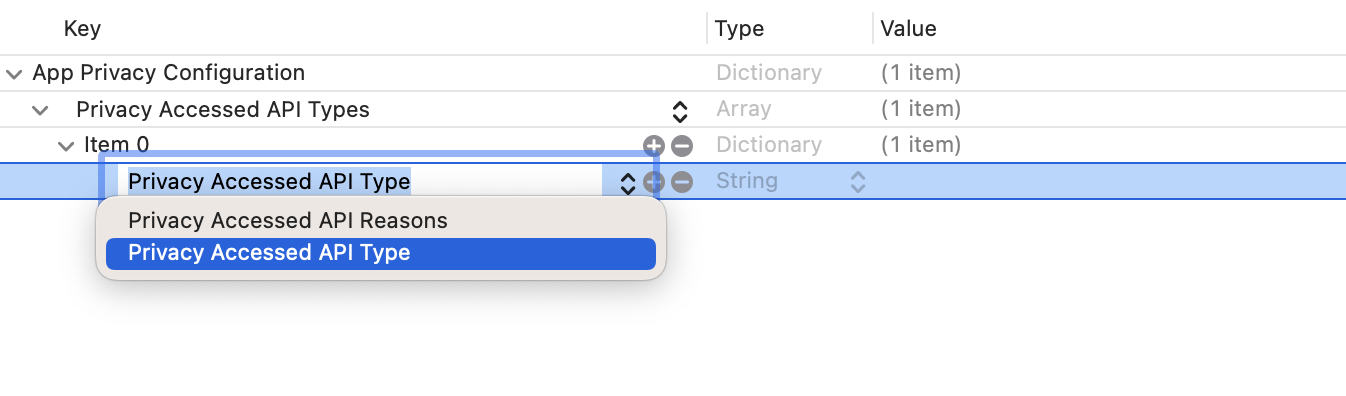
-
Update the NSPrivacyAccessedAPITypeReasons array with the following values for Kindred extension usage. Inside this array, add the values CA92.1 and 1C8F.1 . Clean and build your project to apply the changes
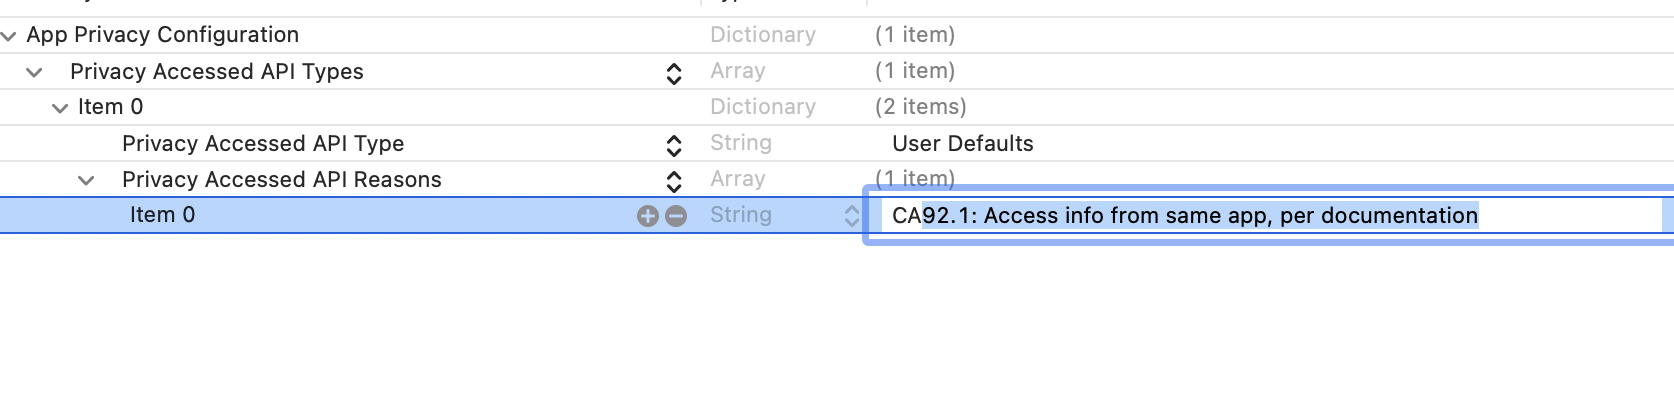
XML Representation of the PrivacyInfo.xcprivacy
<key>NSPrivacyAccessedAPITypes</key>
<array>
    <dict>
        <key>NSPrivacyAccessedAPIType</key>
        <string>NSPrivacyAccessedAPICategoryUserDefaults</string>
        <key>NSPrivacyAccessedAPITypeReasons</key>
        <array>
            <string>CA92.1</string> <!-- Local storage within the extension -->
            <string>1C8F.1</string> <!-- Shared preferences across the app group -->
        </array>
    </dict>
</array>
OfferWall
The Following set up is required if you have opted in for the OfferWall feature.
Firstly please ensure that you have correctly set up your app groups as per the App group configuration section located above in this documentation.
Once you have successfully integrated the extension, under your extension folder you will see an OfferWall.swift file. This file includes the logic which handles opening up the offer wall in a webview as well as authentication related to the offer wall.
You need to ensure that the following files are accessible by your application:
OfferWall.swift and KindredSettings.swift.
To do this:
1 Open XCode
2 Navigate to the project navigator
3 Locate the and select the OfferWall.swift file
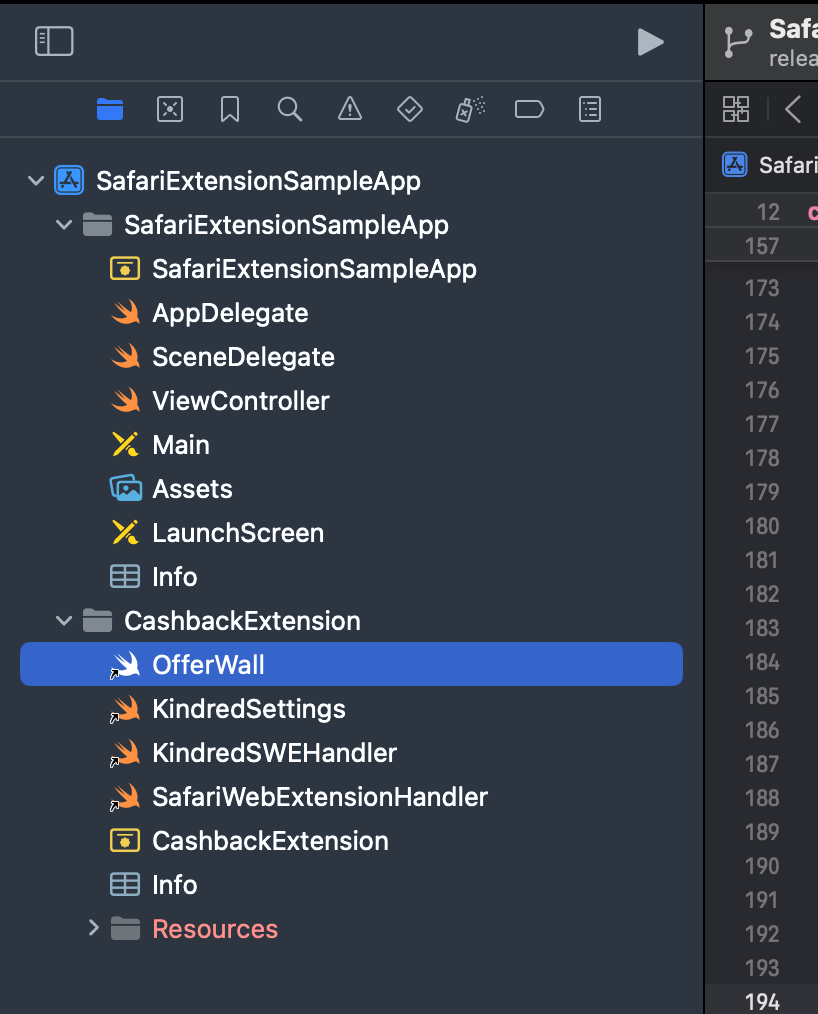
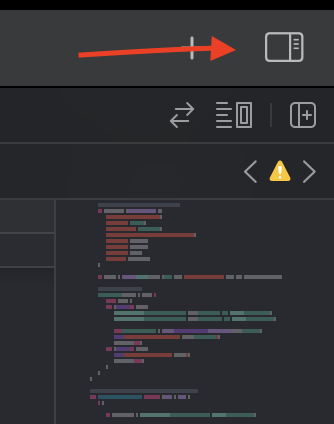
4 Open the file inspector by clicking the icon in the top right corner and make sure that both the extension and the app are selected under target memberships.
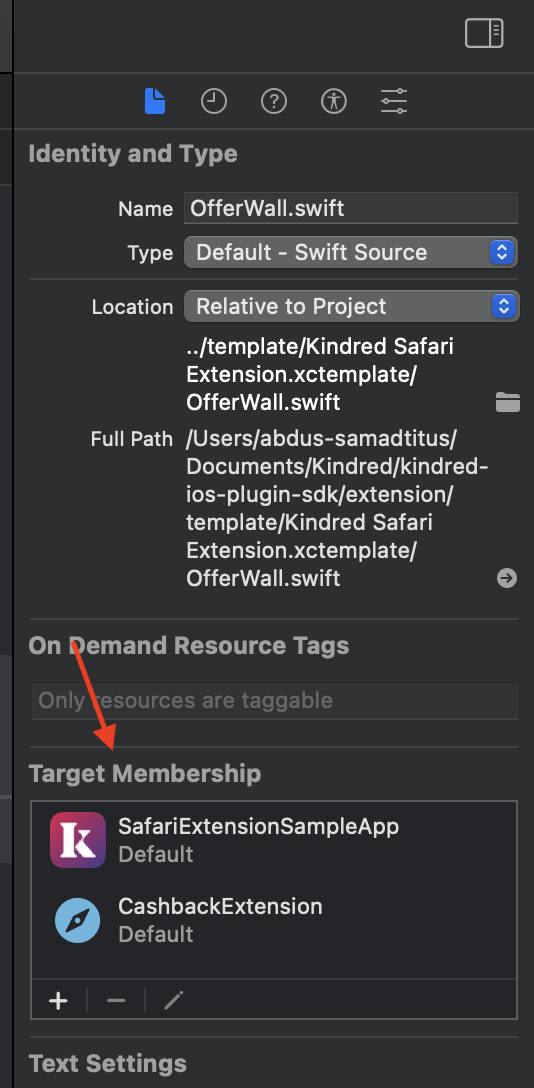
5 Repeat the same steps for the KindredSettings.swift file.
Once the above is done, you would need to add in the following logic to your app to open the webview. There are two call back functions you need to be aware of:
The first one is openURLHandler, this one is used to open the url you specify inside a webview. You need to replace the url with the one to your offerwall.
The second one is closeHandler, this is used to close the webview and gets triggered once a request is made to close the webview from the web side. In the logic we have below we have a simple implementation and the logic needed to close the webview is minimal, but lets say for instance your app requires additional or different logic to close the webview, you can then customize the logic with in this call back function.
Add this logic at the point in which you would want to fire your webview:
       let offerWallInstance = OfferWall.createInstance(with: "YourOfferwallUrl", openURLHandler: { url in
            if let urlToOpen = URL(string: url.absoluteString) {
                UIApplication.shared.open(urlToOpen, options: [:], completionHandler: nil)
            }
        },
        closeHandler: {
            print("OfferWall was closed")
            self.dismiss(animated: true, completion: nil)
        })
        present(offerWallInstance, animated: true, completion: nil)
The above logic, opens a webview with the link specified above.
Lastly you need to add your Kindred api credentials to your apps info.plist file. Please add the below to your apps info.plist file and add in your credentials, these should be the same ones that you would use in the extensions info.plist as you would of done following the IOS docs.
You should add the following to your apps Info.plist file
    <key>Kindred</key>
    <dict>
        <key>CLIENT_ID</key>
        <string>your client id</string>
        <key>CLIENT_SECRET</key>
        <string>your client secret</string>
        <key>SHARED_KEY</key>
        <string>your shared key</string>
    </dict>
Optional API Override
This feature is opt-in and is enabled when the client provides a custom repository implementation during Safari Extension initialization. We introduce a pluggable KindredRepositoryDelegate protocol which defines partner-owned deal lookup, activation, and extension activation lifecycle methods. The KindredSWEHandler.registerKindredRepositoryDelegate() method is used to inject the partner implementation into the extension. KindredSWEHandler then delegates deal lookups and activations to the partner-injected repository and skips all Kindred network calls in this case.
Enabling the Override
This feature is available in the Kindred iOS SDK. To enable this, first create a class that implements KindredRepositoryDelegate and register it during Safari Extension initialization:
Step 1: Create the Repository Override Class
In Xcode, create a new Swift file:
-
Right-click on your Safari Extension folder (e.g.,
CashbackExtension) in Xcode -
Select New File... → Swift File
-
Name it (e.g.,
MyRepositoryOverride.swift) -
IMPORTANT: Ensure the file is added to your Safari Extension target
import Foundation

// Create KindredRepositoryDelegate implementation
class MyRepositoryOverride: NSObject, KindredRepositoryDelegate {

    // Optional: Two-step API flow
    @objc func doesPromoExist(domain: String, affiliateInfo: AffiliateInfo?) -> Bool {
        // TODO: implement your own logic to determine if a promo exists

        // Example:
        // return domain.contains("example.com")

        return false
    }

    func findDeal(domain: String) -> DealLookupResult {
        // TODO: query your internal service or cached data

        let deal = DealLookupDeal(
            id: "your-campaign-id",
            domains: ["example.com"]
        )

        let codes = [
            DealLookupCoupon(
                code: "SAVE20",
                summary: "Save 20% on all orders",
                termsAndConditionsUrl: "https://example.com/terms"
            )
        ]

        return DealLookupResult(deal: deal, codes: codes)
    }

    func activateDeal(campaignId: String) -> DealClickResponse? {
        // TODO: perform activation and return the redirect payload

        let trackingUrl = "https://your-tracking-service.com/redirect?id=\(campaignId)"
        return DealClickResponse(link: trackingUrl)
    }

    @objc func onExtensionActivated() {
        // Optional: logic you want to run when the extension gets activated.
    }
}
then
// Register in SafariWebExtensionHandler

class SafariWebExtensionHandler: KindredSWEHandler {

    private var repositoryOverride: MyRepositoryOverride?

    override init() {
        super.init()

        // Register your repository override
        repositoryOverride = MyRepositoryOverride()
        self.registerKindredRepositoryDelegate(repositoryOverride!)

        // ...other configurations...
    }
}
Customizations
**Popup Customisation
You can modify the look and feel of our popups to suit your brand needs.You can customize your popups by editing the styles.css file which is located at /Resources/static/css/styles.css
The following styles are available for customisation:
Font Family
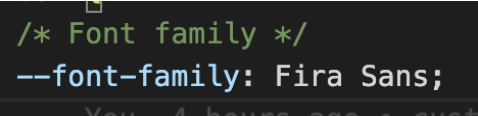
This refers to the font used throughout the extension
If you want to use your own custom fonts follow the steps below:
Inside the /Resources/static/ folder create a new folder called fonts.
Then add your font files into that folder.
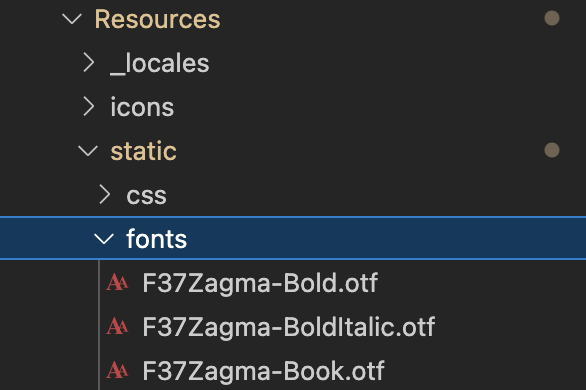
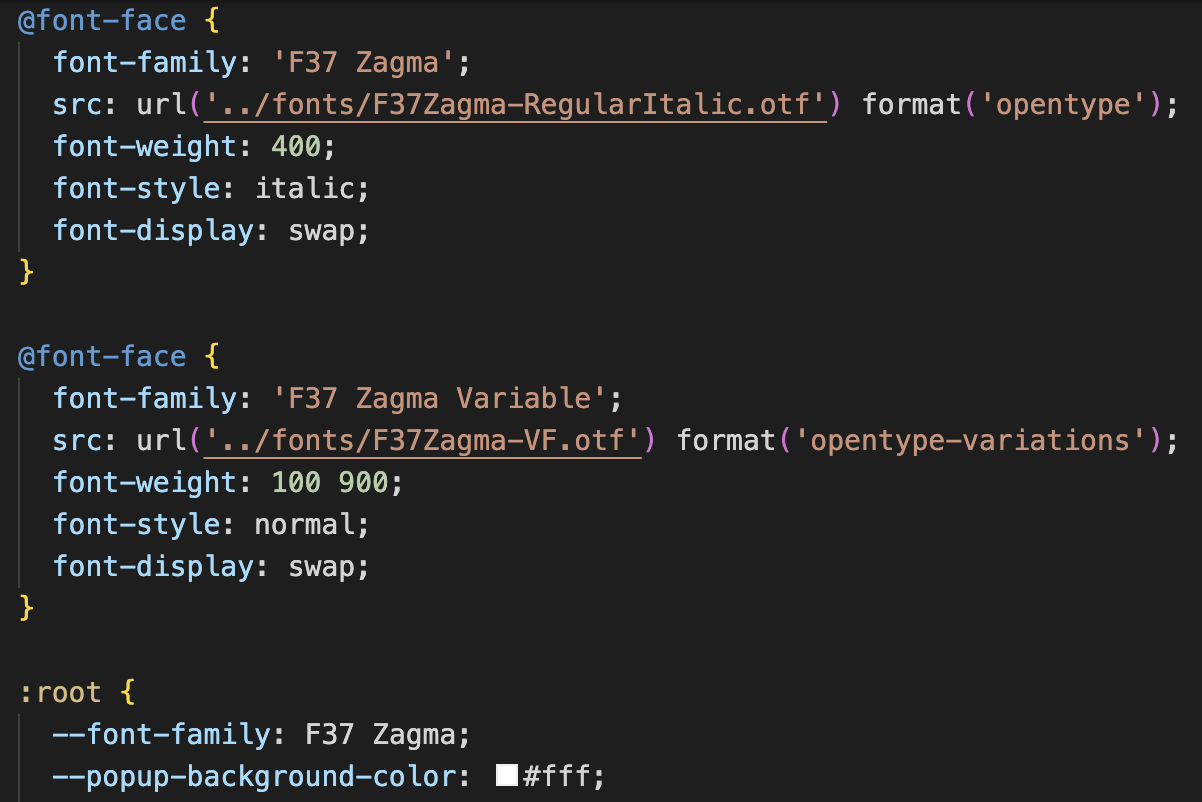
Then navigate to the /Resources/static/css/styles.css file, you would then need to link your fonts at the very top of the file, once this is completed you can then set the --font-family to your newly added font.
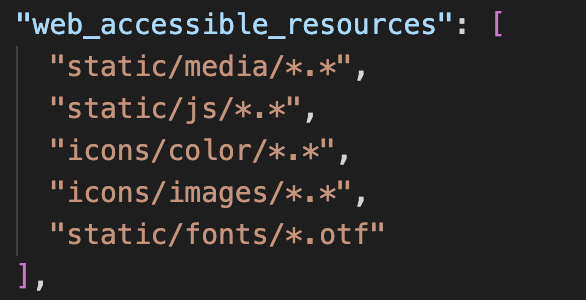
After you have linked your fonts and set the --font-family style to your new font. Open the manifest.json file and navigate to the web_accessible_resources section, you then need to give it access to your font files. You can do this by adding the following line "static/fonts/*.otf",
it should now look like this:
You custom fonts should now work throughout the extension.
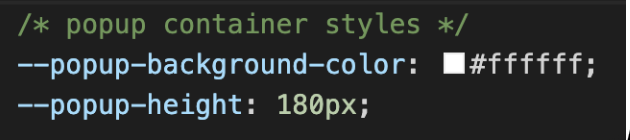
Popup Container styles_
These styles refer to the background colour and height of all popups throughout the extension excluding the coupons listing popup.
Bar Styles

These styles refer to the styling of the top bar located at the top of the popup container.

Round_Roundel Styles
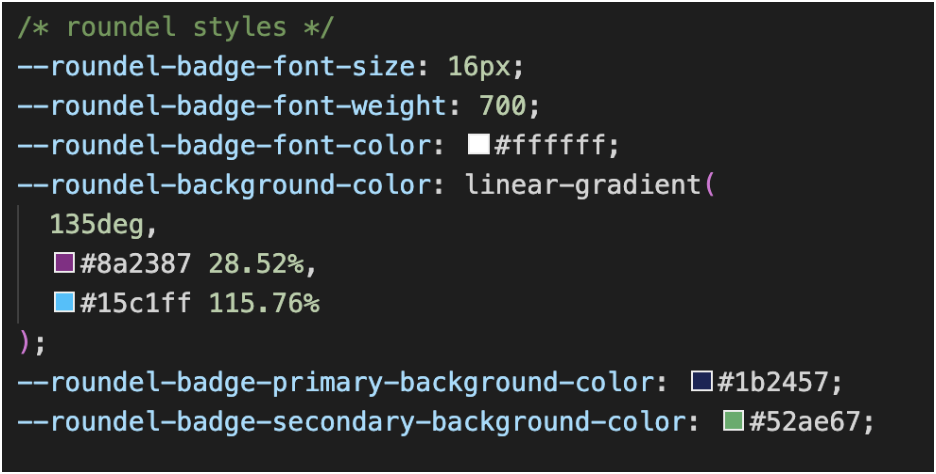

These styles refer to the draggable roundel that appears on the right hand side of the site. Details on how to customize the image can be found under the Image customisation section of this documentation.
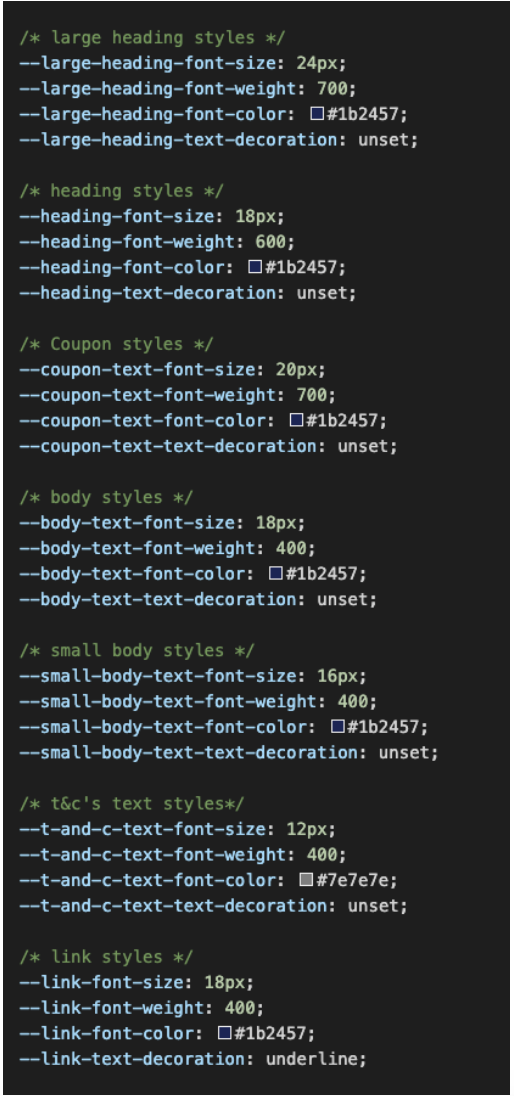
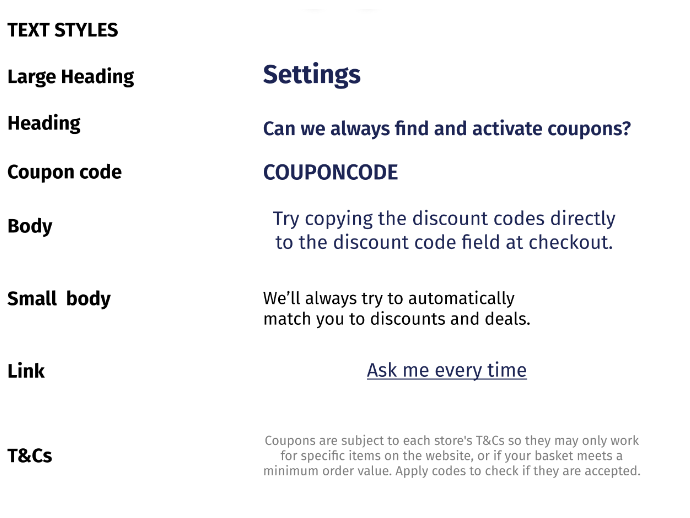
Text Styles
These styles refer to the different text being used throughout the extension, eg changing the heading style changes the the styling of all headings throughout the extension.
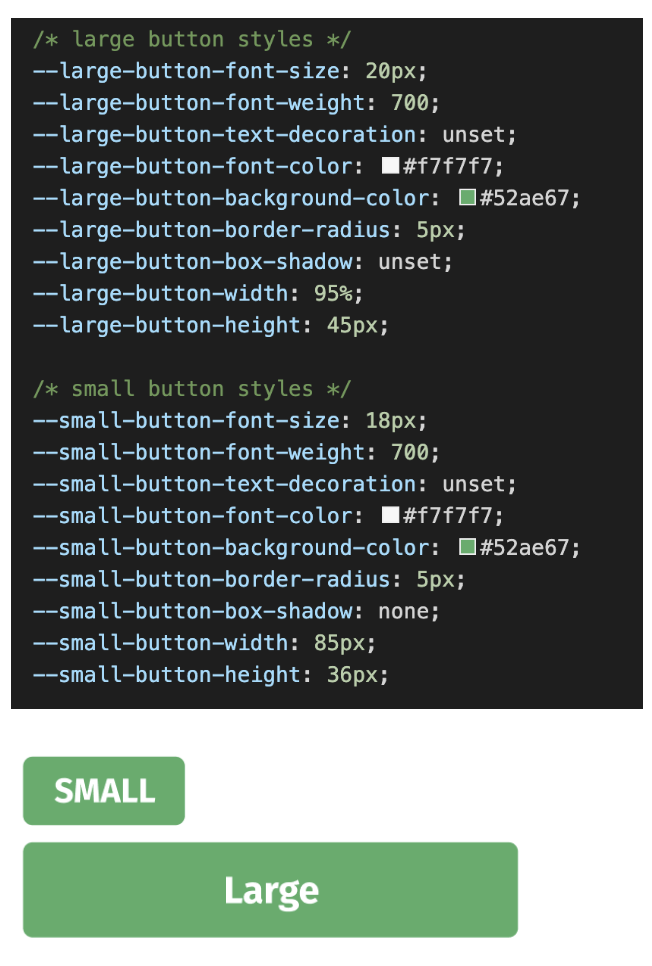
Button styles
These refer to the styling for the two types of buttons we have throughout the extension
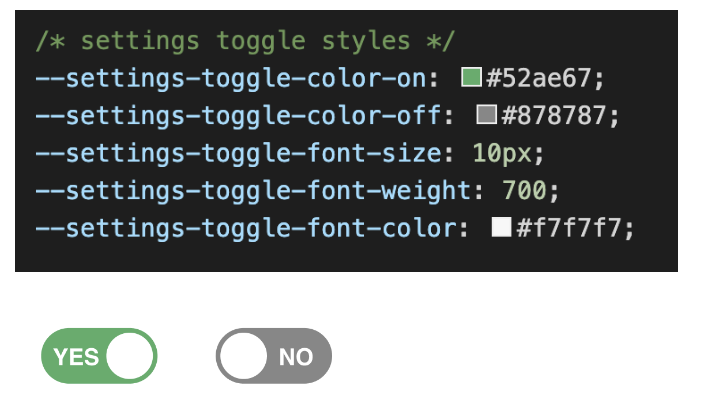
Settings tab toggles
This refers to the styling of the toggles under the settings tab
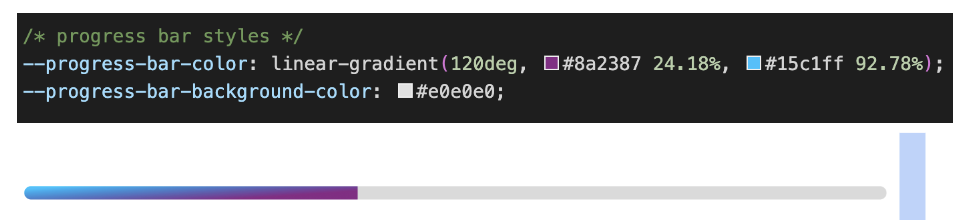
Progress bar styles
This refers to the progress bar which appears on the deal activating and auto-coupons in-progress popups
Customising Images
We have the ability to change certain images on the extension.
You can change these images by adding your images inside the Resources/icons/images folder then editing the variables.js file located at Resources/static/js/variables.js with the path to your image.
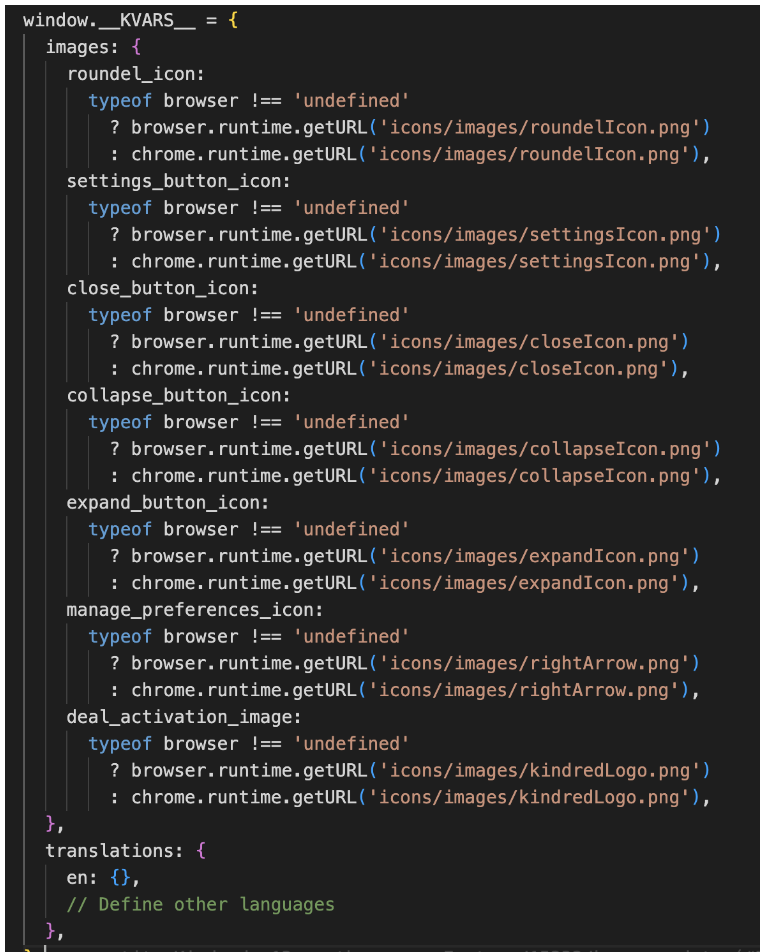
The images you have the ability to change are the ones below:
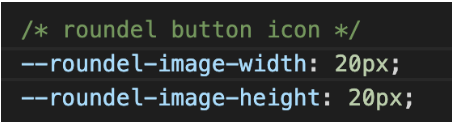
roundel_icon:
The “K” inside the roundel can be customised to an image of your choice with the size of 20*20px.

Additionally the roundel image size can be adjusted if need be by editing the following style inside the styles.css file:
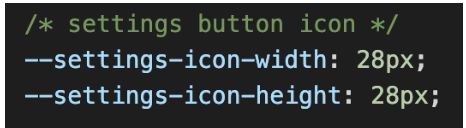
settings_button_icon:
This image refers to the setting button located on the coupons listing popup and can be customized to an image of your choice with the size of 28*28px

Additionally the settings icon image size can be adjusted if need be by editing the following style inside the styles.css file:
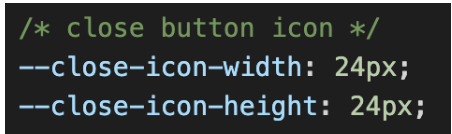
close_button_icon:
This image refers to the close button located on certain popups and can be customized to an image of your choice with the size of 24*24px
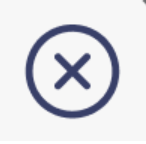
Additionally the settings icon image size can be adjusted if need be by editing the following style inside the styles.css file:
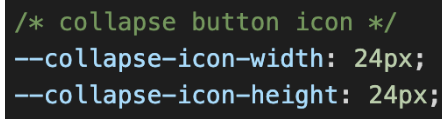
collapse_button_icon:
This image refers to the collapse button located on certain popups and can be customized to an image of your choice with the size of 24*24px

Additionally the settings icon image size can be adjusted if need be by editing the following style inside the styles.css file:
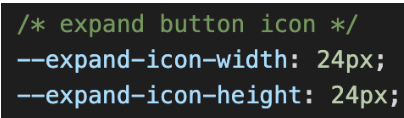
expand_button_icon:
This image refers to the expand button located on certain popups and can be customized to an image of your choice with the size of 24*24px

Additionally the settings icon image size can be adjusted if need be by editing the following style inside the styles.css file:
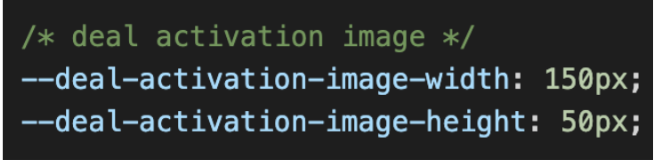
deal_activation_image:
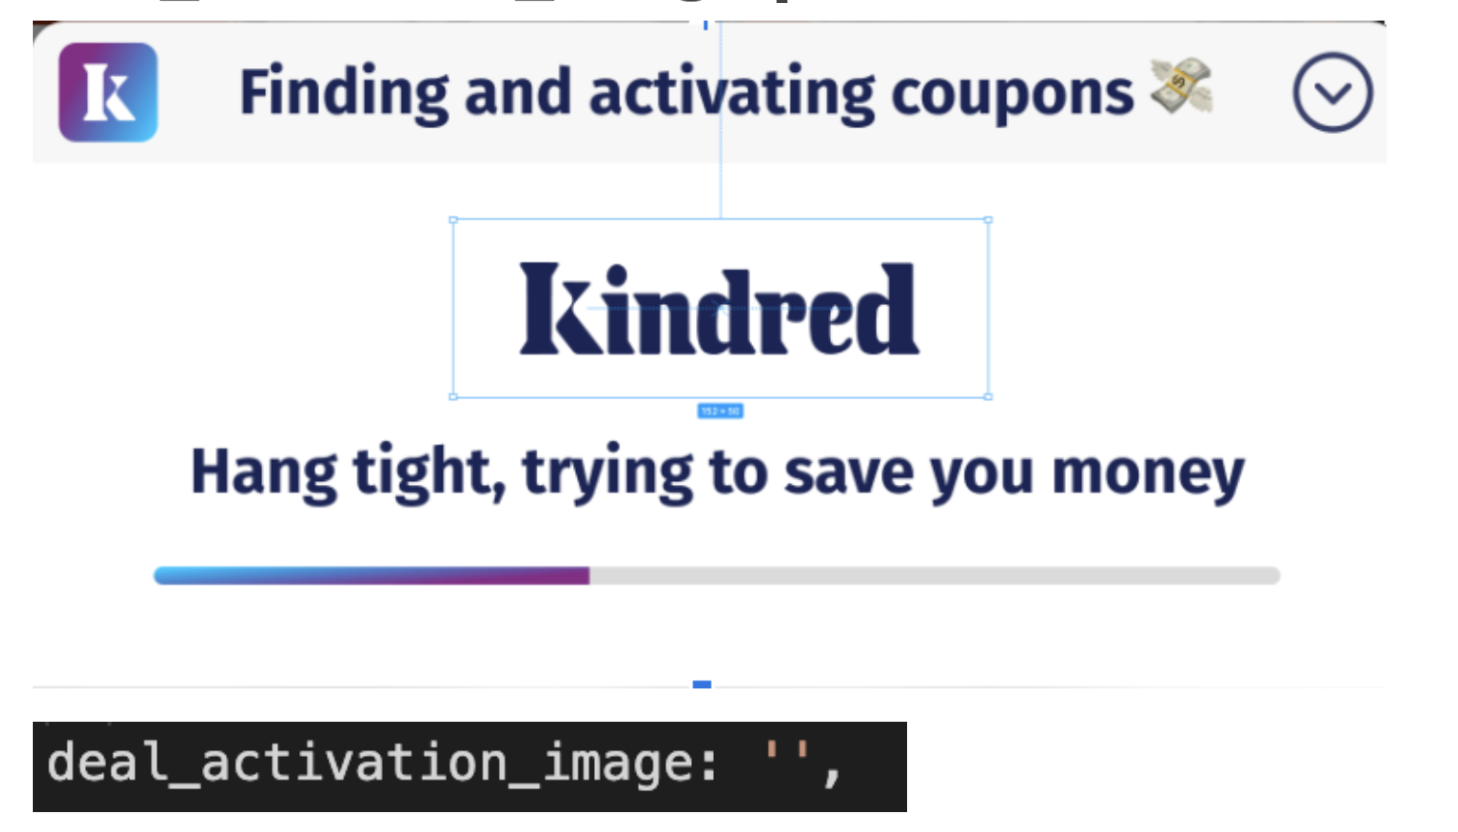
This specific image is an optional image. You can choose to customize it to an image of your choice with the size of 150*50px or set it to an empty string to not display any image.
Additionally the image size can be adjusted if need be by editing the following style inside the styles.css file
Customizing Text
All text throughout the extension is customizable.
Text can be changed using the variables.js file located at Resources/static/js/variables.js
There is a translations object which allows for adding custom text, the only condition is that this exact object structure and key names need to be used as below. In the translations object you need to prefix the object with the language code as in the below file, the easiest way to do this would be to copy the entire object below and change the fields you need. To add any customised text for any other additional languages, please add additional objects for each language. E.g en: {}, de: {}
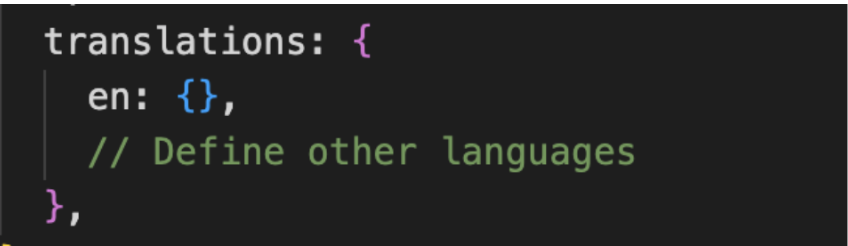
translations: {
en: {
"contentApp": {
"deals": {
"activated": {
"hasCodesPopupTitleMultipleCodes": "{{total}} coupons found 🎉",
"hasCodesPopupTitleSingleCode": "1 coupon found 🎉",
"noCodesPopupTitle": "Sorry, no coupons. Planting 🌳🌲"
},
"activating": {
"popupTitle": "Finding and activating coupons 💸",
"searchingForCoupons": "Hang tight, trying to save you money"
},
"available": {
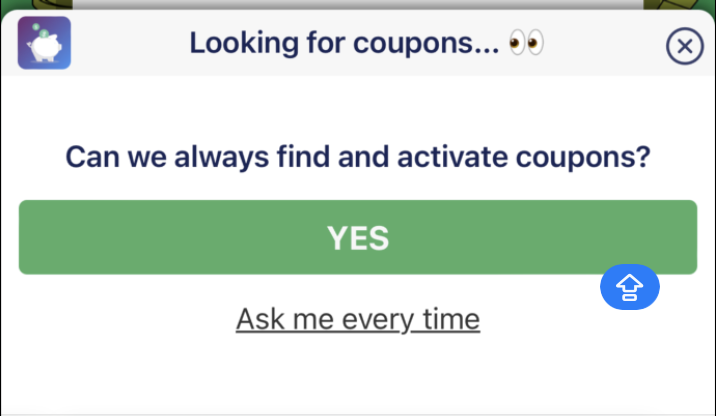
"popupTitle": "Looking for coupons... 👀",
"line1": "Can we always find and activate coupons?",
"activateAll": "YES",
"activate": "Ask me every time"
},
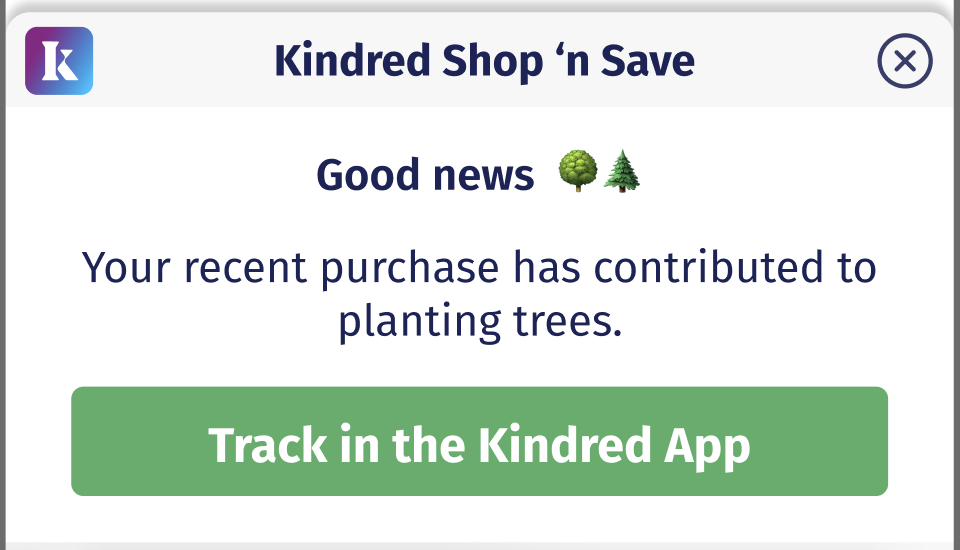
"postPurchase": {
"title": "Kindred Shop ‘n Save",
"line1": "Good news 🌳🌲",
"line2": "Your recent purchase has contributed to planting trees.",
"cta": "Track in the Kindred App",
"o2": "Check out your trees planted in the O2 app"
},
"couponsAvailable": {
"popupTitleMultipleCodes": "{{total}} coupons found 🎉",
"popupTitleSingleCode": "1 coupon found 🎉",
"applyDiscounts": "Apply the best deal",
"savingMoney": "We ❤️ saving you time and money",
"couponsFound": "Here’s the coupons we’ve found.",
"couponCopied": "Code copied to clipboard ✅",
"customButton": "Track your impact"
}
}
},
"coupon": {
"copied": "Copied",
"copy": "Copy",
"termsAndConditions": "View Ts&Cs"
},
"termsAndConditions": {
"click": "View T&Cs",
"expanded": "Coupons are subject to each store's T&Cs so they may only work for specific items on the website, or if your basket meets a minimum order value. Apply codes to check if they are accepted."
},
"autocoupons": {
"start": {
"popupTitleMultipleCodes": "{{total}} coupons found 🎉",
"popupTitleSingleCode": "1 coupon found 🎉",
"line1": "Let’s find you the best deal",
"button": "Test coupons"
},
"inprogress": {
"popupTitleMultipleCodes": "{{total}} coupons found 🎉",
"popupTitleSingleCode": "1 coupon found 🎉",
"lookingForDiscounts": "Testing coupon {{coupon}} of {{total}} ",
"savings": "Best saving so far: {{currency}}{{savings}}"
},
"continue": "Got it",
"finished": {
"popupTitle": "Coupon code applied 🎉",
"line1": "We’ve applied the best coupon code,",
"totalSavings": "saving you {{currency}}{{savings}} "
},
"failed": {
"popupTitleMultipleCodes": "{{total}} coupons found 🎉",
"popupTitleSingleCode": "1 coupon found 🎉",
"line1": "Coupon codes couldn’t be automatically applied.",
"line2": "Try copying the discount codes directly to the discount code field at checkout."
},
"nosavings": {
"popupTitleMultipleCodes": "{{total}} coupons found 🎉",
"popupTitleSingleCode": "1 coupon found 🎉",
"line1": "You’ve already got the best price 👍 "
}
},
"kmenu": {
"couponCodes": "Coupon Codes",
"applyDiscounts": "Apply the best deal",
"activate": "Plant trees for me",
"whoohoo": "Woohoo! 🎉",
"activated": "Woohoo! Planting trees with your purchase.",
"activatedNoCoupons": "We’ll plant trees on your behalf when you purchase from this retailer.",
"availableCodes": "{{codes}} coupons found",
"codesExplainer": "If codes don’t pop up automatically at checkout, you can copy them here and apply them.",
"noDealsOrCoupons": {
"noCodes": "Sorry, no coupons found",
"checkBackSoon": "We add new coupons on a regular basis, so please check back soon."
},
"settings": {
"title": "Settings",
"autoCheckCoupons": "Always find and apply deals",
"autoCheckCouponsExplainer": "We’ll always try to automatically match you to discounts and deals.",
"allowPinnedIcon": "Hide bottom notification bar",
"allowPinnedIconExplainer": "We’ll show a discreet coupon count instead.",
"toggledOn": "YES",
"toggledOff": "NO"
},
"extensionActivated": {
"line1": "And... we’re activated ✅",
"line2": "We’ll pop up whenever we find you discount codes.",
"buttonText": "Got it"
}
},
"userConsent": {
"settings": {
"title": "Manage privacy preferences",
"save": "Save and exit",
"cancel": "Cancel",
"agree": "Consent to all",
"disagree": "Withdraw all consent",
"managePrivacy": "Control how we use your data",
"howWeFindPersonalisedCodes": "How we find personalised discount codes",
"expand": "Expand",
"collapse": "Collapse",
"forExample": "For example: {{illustration}}",
"relyOn": "{{noOfVendors}} vendors",
"loading": "Loading consent data...",
"nonInUse": "Non in-use",
"purposes": {
"title": "Purposes / Features",
"descriptionPart1": "Kindred Soul Ltd. participates in the <0>IAB Europe Transparency & Consent Framework</0> (IAB TCF) and complies with its specifications and policies. This Consent Management Platform is operated by us and has identification number [1245].",
"descriptionPart2": "We work with up to {{totalNoOfVendors}} partners to show you discount codes for products and services you’re shopping for. Understand how your data may be used and who our partners are below.",
"acceptAll": "Accept All",
"viewAll": "Click here to view all individual options",
"minimise": "Minimise all individual options",
"privacyPolicy": "Click here to view the Privacy policy"
},
"vendors": {
"title": "Vendors",
"descriptionPart1": "We work with up to {{totalNoOfVendors}} partners to show you discount codes for products and services you’re shopping for. Understand how your data may be used and who our partners are below.",
"descriptionPart2": "To ensure your choices are respected we associate them with a unique ID, which is stored in local storage with an entry named userConsentOptions. This data is stored in the UK or the EU for up to 2 years or less if you withdraw your consent, if you have used our privacy preference management facility to manage your privacy preferences.",
"enable": "Enable",
"enableAll": "Enable All",
"disableAll": "Disable All",
"cookieDetails": "This vendor stores cookies with a maximum duration of about {{days}} Day(s) ({{seconds}} Second(s)).",
"cookieRefresh": "One or several of the vendor’s cookies may be refreshed.",
"nonCookieAccess": "This vendor also uses other methods like 'local storage' to store and access information on your device.",
"privacyPolicy": "Privacy Policy: <0>{{vendorName}}</0>",
"legitimateInterest": "Legitimate Interest: <0>{{vendorName}}</0>",
"retentionPeriod": "Retention: {{days}} days",
"nonTcfVendorsDescription": "We do not currently work with any non-TCF Vendors.",
"top": "Top",
"bottom": "Bottom",
"consentToggle": "Consent:",
"legitimateInterestToggle": "Legitimate Interest:"
},
"subHeadings": {
"tcfVendors": "TCF Vendors",
"nonTcfVendors": "Non-TCF Vendors",
"purposes": "Purposes",
"specialPurposes": "Special Purposes",
"legIntPurposes": "Legitimate Interest Purposes",
"features": "Features",
"specialFeatures": "Special Features",
"dataDeclaration": "Categories of data collected/processed"
}
},
"popup": {
"line1": "Can we find discount codes for you?",
"line2": "We and our <0>partners</0> process, store and/or access personal data from your device based on legitimate interest and your consent to display personalised advertising and content, advertising and content measurement, audience research and services development.",
"line3": "You can control how your data is used, withdraw your consent, or object to our use of processing your data on the basis of legitimate interest, view our <0>{{noOfVendors}}</0> partners and see more information at any time, via the privacy preferences from within our extension settings menu.",
"buttonText": "Yes I agree – Show me discount codes",
"managePrivacy": "Manage my privacy preferences",
"popupTitle": "Kindred Shop n’ Save"
}
}
}
//define other languages
}
License Agreement: https://event.kindred.co/licensing-terms-and-conditions
Updated 4 months ago