
Unity SDK Implementation Guide
We've made it easy to add the Kindred SDK to your mobile game using Unity. By following these simple steps, you'll start earning more revenue from your game! Setting up the Kindred SDK within your Unity project is simple and straightforward. After filling out all the relevant details, press "Prepare Android Build" or "Prepare iOS Build" and your browser extension will be ready to use. Once the SDK is installed, it's essential to add call-to-action for your players, so they are aware of the new feature and how to activate it. Remember to do this after implementation, it is a crucial step! 👥** Join our Kindred Slack Channel now to claim your integration bonus and get technical support from our team!**
🎥 Video: Quick start with a video tutorial
Watch the video tutorial below to get started quickly, or watch on YouTube here video
License Agreement: https://event.kindred.co/licensing-terms-and-conditions
💡Before you begin
Before getting started, ensure your development environment meets the following pre-
requirements.
- Unity Editor
Minimum versions:
iOS: Unity 2019.4.40
Android: Unity 2020.1.17 - Unity account
- Unity setup for Android Development
https://docs.unity3d.com/560/Documentation/Manual/android-GettingStarted.html - Unity setup for iOS Development
https://docs.unity3d.com/560/Documentation/Manual/iphone-GettingStarted.html - For iOS, the Kindred SDK requires App Group capability
https://developer.apple.com/documentation/xcode/configuring-app-groups
🌟Unity Integration
Add the Kindred Unity Asset to your project
- Open your project in Unity
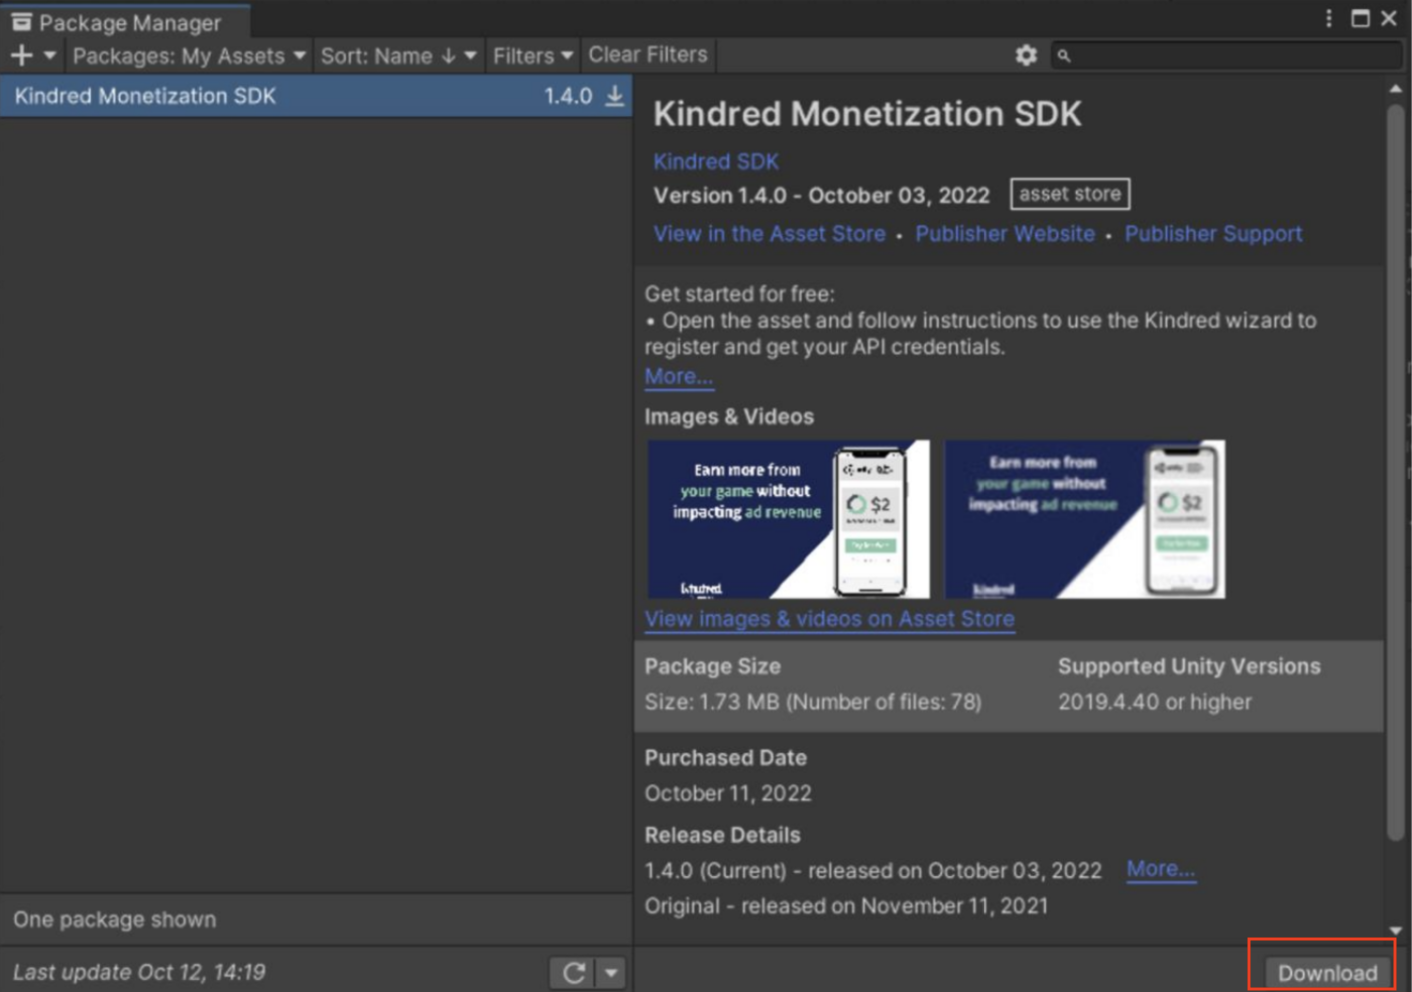
- Download the latest version of the Kindred Asset from the Unity Asset Store
https://assetstore.unity.com/packages/add-ons/kindred-monetization-sdk-205445 - Once downloaded, open the asset in Unity
- Import the asset into your Unity project using the Unity Package Manager. Click on
the Download button and then click on Import (bottom-right corner).
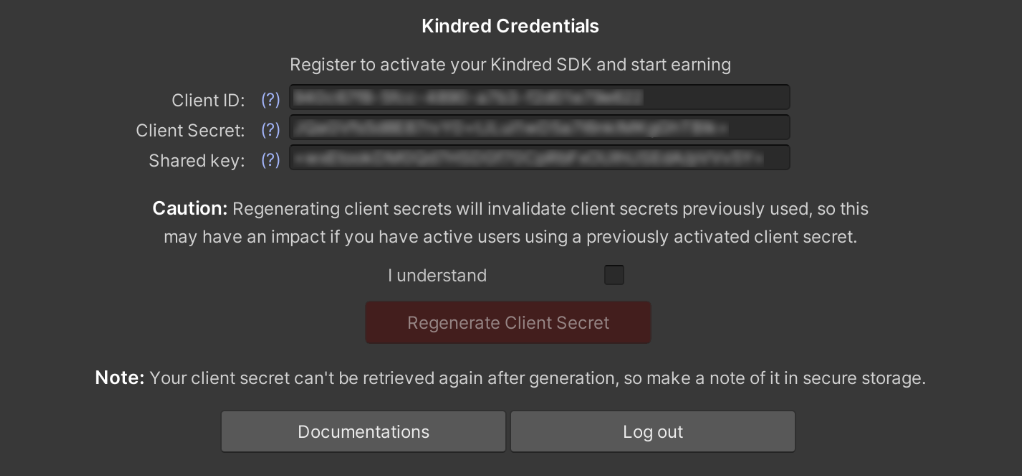
Generate your SDK Credentials
The SDK Credentials are made up of:
- Client Id
Guid used to identify the credentials - Shared Key
String we use to prove the validity of the credentials - Client Secret
String we use to validate your credentials - Client Secondary Secret
String you can use if you ever need to reset your credentials to avoid downtime on
your client app (Find out more on the Resetting your secret section)
Make sure to take a note of these as if they are lost you will have to reset them
through the portal.
You have two options to generate your SDK credentials:
• From Unity, through the Kindred Setup Wizard (quickest & recommended)
• From our SDK Portal at https://sdk-portal.kindred.co
If you want to generate the credentials directly from Unity:
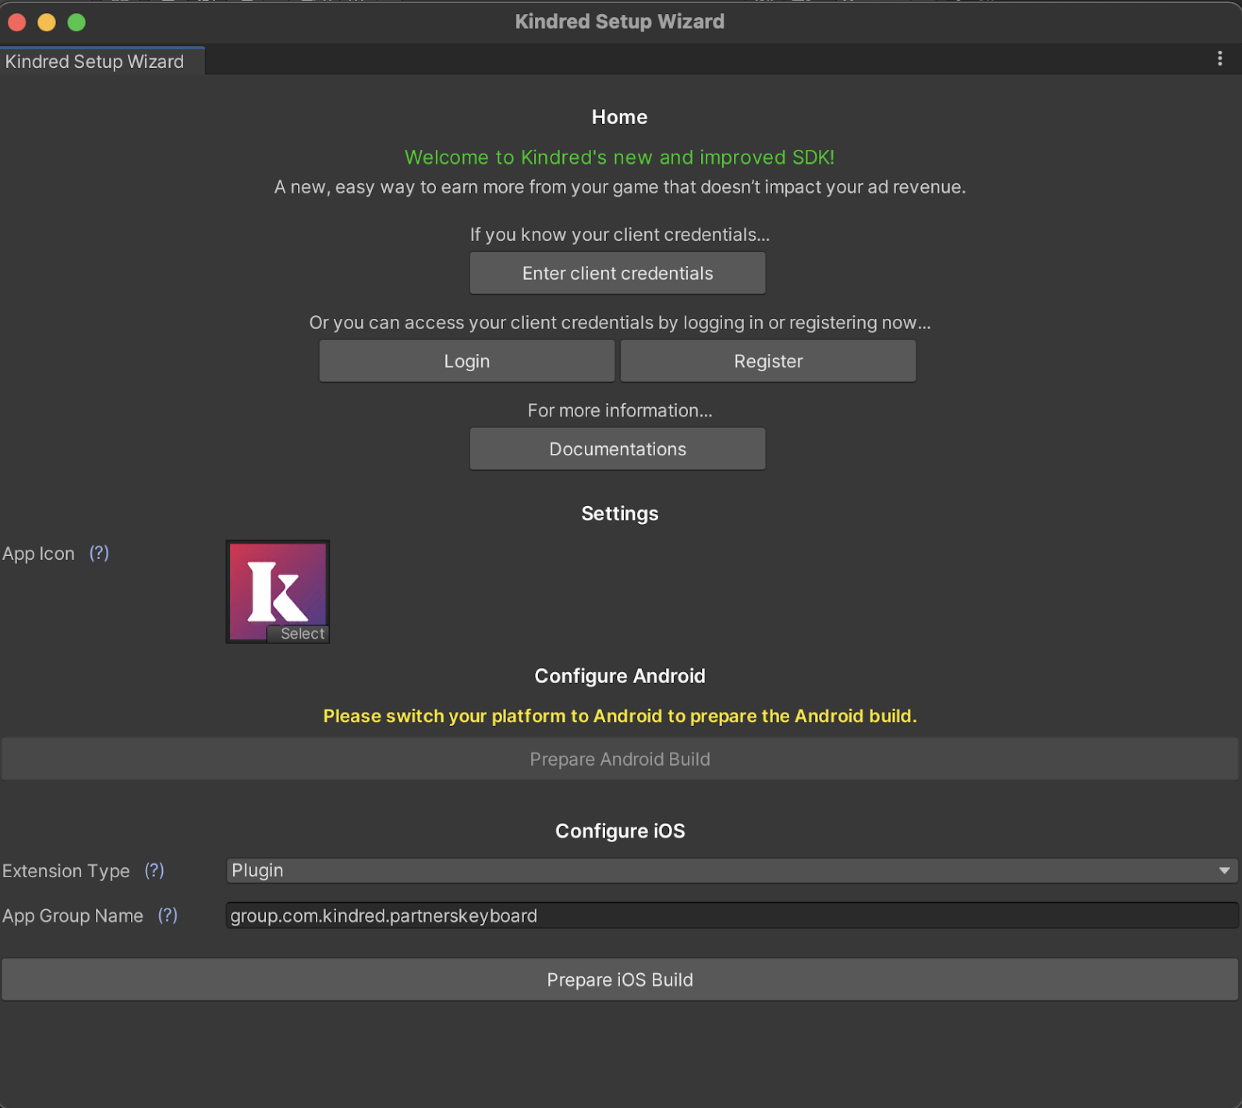
- Open the Kindred Setup Wizard (From the navigation bar, click on Kindred >
Configuration) - If you haven’t signed up and generated credentials before for the Kindred SDK, please
use the wizard to register with us and generate your SDK credentials. If you have
already done so, you can use the wizard to login and automatically retrieve your
credentials.
- For security reasons, the client secret will only be shown once upon creation.
Make sure you store it safely straight after you’ve generated the credentials. If
you had previously generated the SDK credentials, the client secret will be shown as
“empty-secret” on the wizard. You will need to replace it with the client secret you
have stored securely.
If you want to generate your SDK credentials from the SDK Portal:
- Navigate to https://sdk-portal.kindred.co
- Click on Register
- Fill in the form and submit
- Once logged in, click on Credentials from the left-hand side menu
- Under the SDK Credentials section, click on Generate
- For security reasons, client secrets will be shown only once upon creation. Please store them safely before closing the tab or refreshing the page. Once you close the tab, they won’t appear again.
- Go back to your Unity project
- From the navigation bar, click on Kindred > Configuration to open the Kindred Setup Wizard
- From the Kindred Setup Wizard, click on Log in using the same e-mail and password you have used to register on the SDK Portal
- Your credentials are automatically pulled into the wizard. The client secret will be
shown as “empty-secret” on the wizard. You will need to replace it with the client
secret you have stored securely.

Configure the SDK
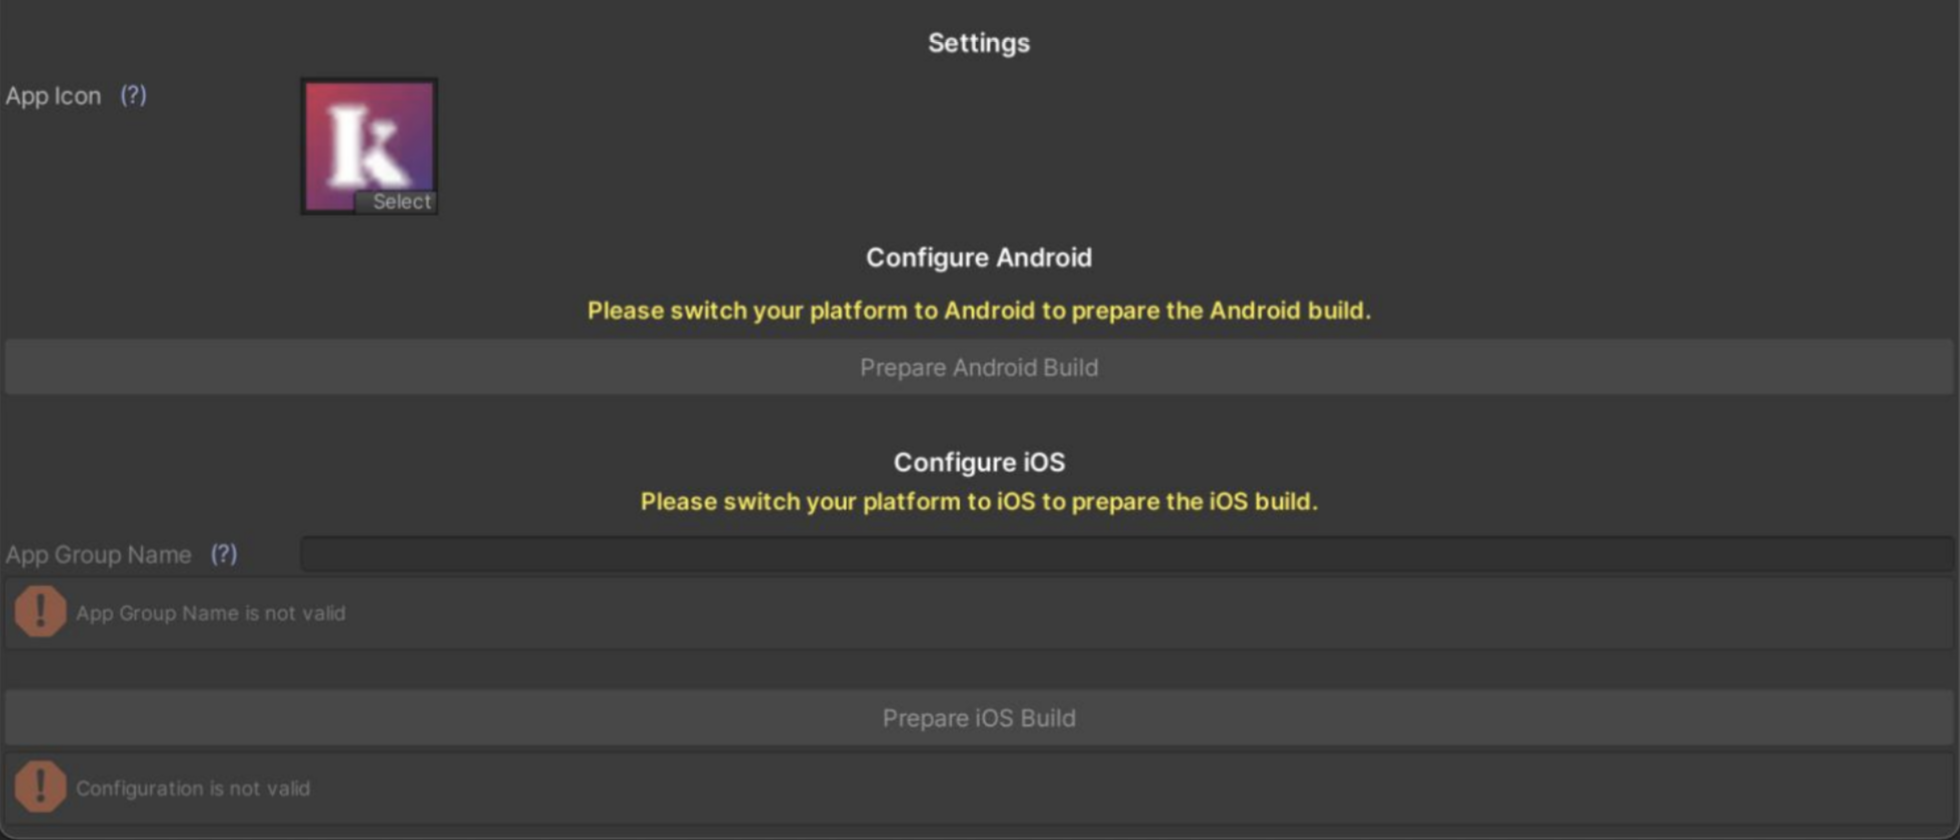
Using the Kindred Setup Wizard, upload your app icon. This will be displayed on the browser extension. The recommended resolution is 128x128px
Prepare the Android build
- Using the Kindred Setup Wizard, click on “Prepare Android Build”. If you get a yellow warning “please switch your platform to Android to prepare the Android build”, go to the Build Settings > Android and click Switch Platform. Then close the build settings and go back to the Kindred Setup Wizard.
- After version 2.0.0, Kindred Sdk uses External Dependency Manager for Unity for managing dependencies. If it is the first time you use EDM4U in your project, when the project platform is or switched to Android, you will be encountered with a panel asking “Enable Android Auto-resolution?”.
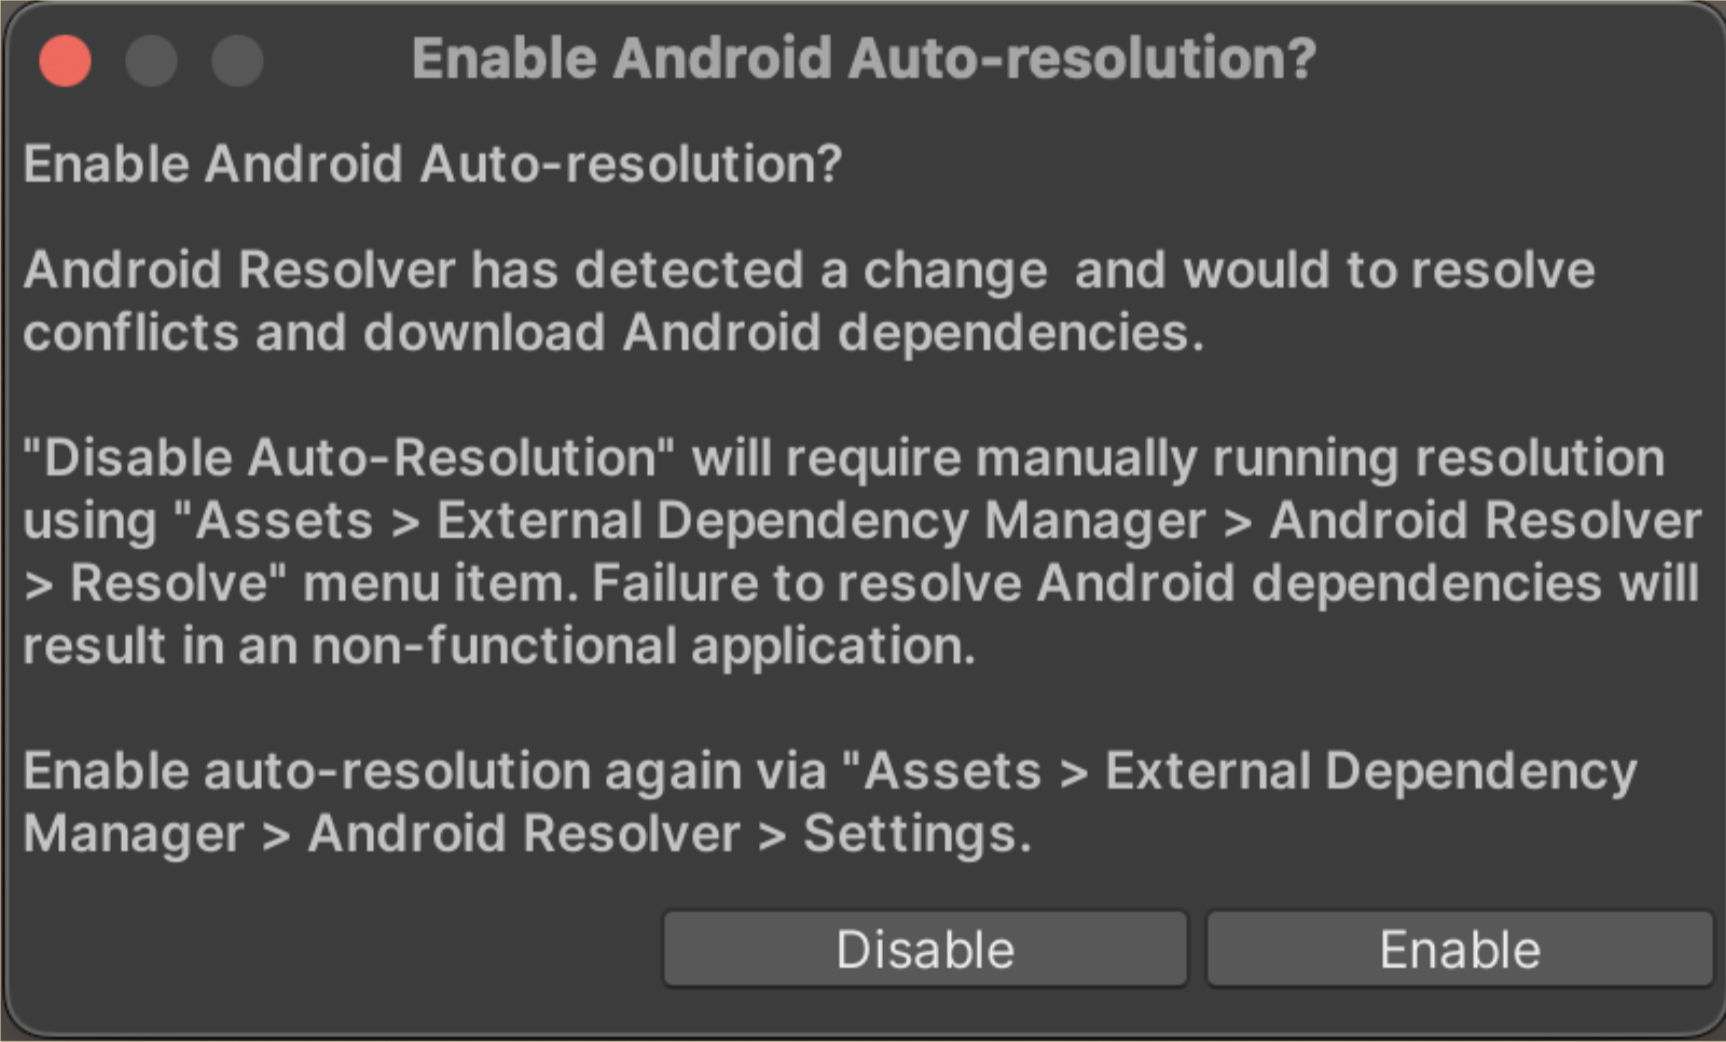
Select “Enable” to let EDM4U manage your dependencies automatically. If you use EDM4U in your project before and auto-resolution is disabled, then you need to select “Resolve” or “Force Resolve” from the top menu under Assets/External Dependency Manager/Android Resolver to update dependencies manually.
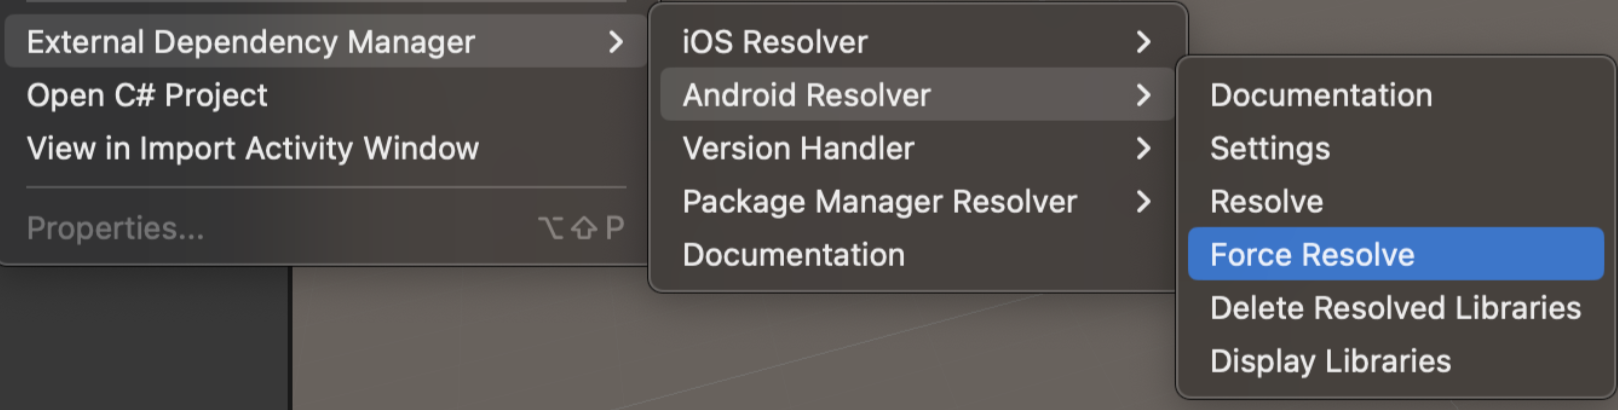
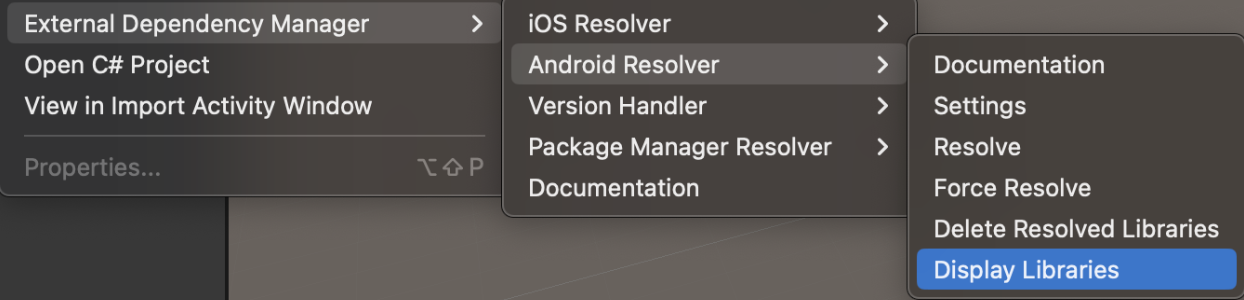
EDM4U may sometimes fail to inject dependencies successfully. From the top menu, by selecting “Display Libraries”, you can see the dependencies to be injected by EDM4U. Here, you can compare the dependencies of mainTemplate.gradle with the displayed dependencies. If they don’t match, you need to select “Resolve” or “Force Resolve” from the top menu to update dependencies.
Scene's selection
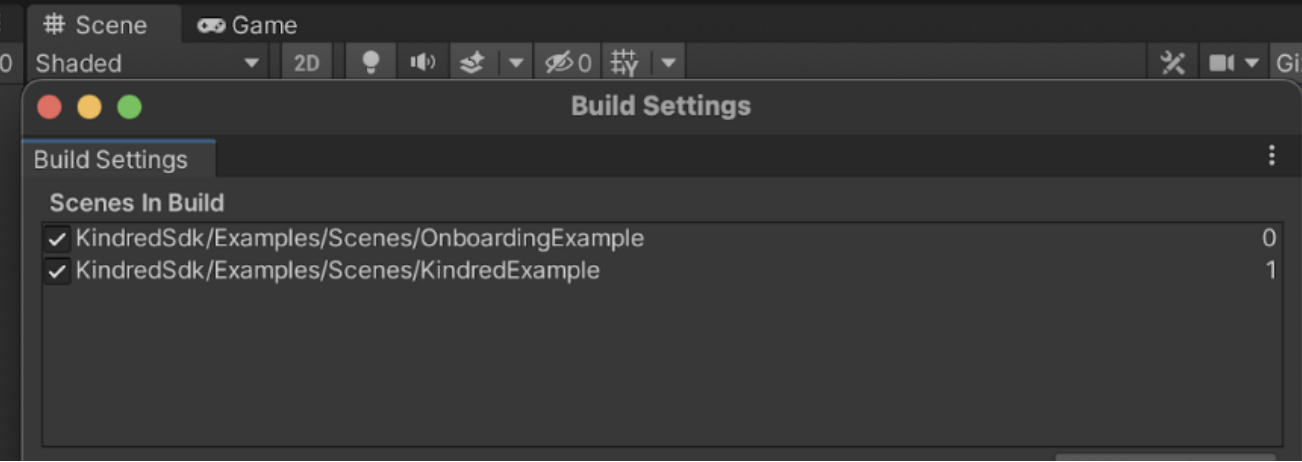
The Kindred Unity Asset comes with 2 sample scenes:
• KindredExample
Shows how to use the KindredSdkBridge functions such as SetUserId
• OnboardingExample
Shows a sample onboarding journey to guide users on how to activate the browser
extension.
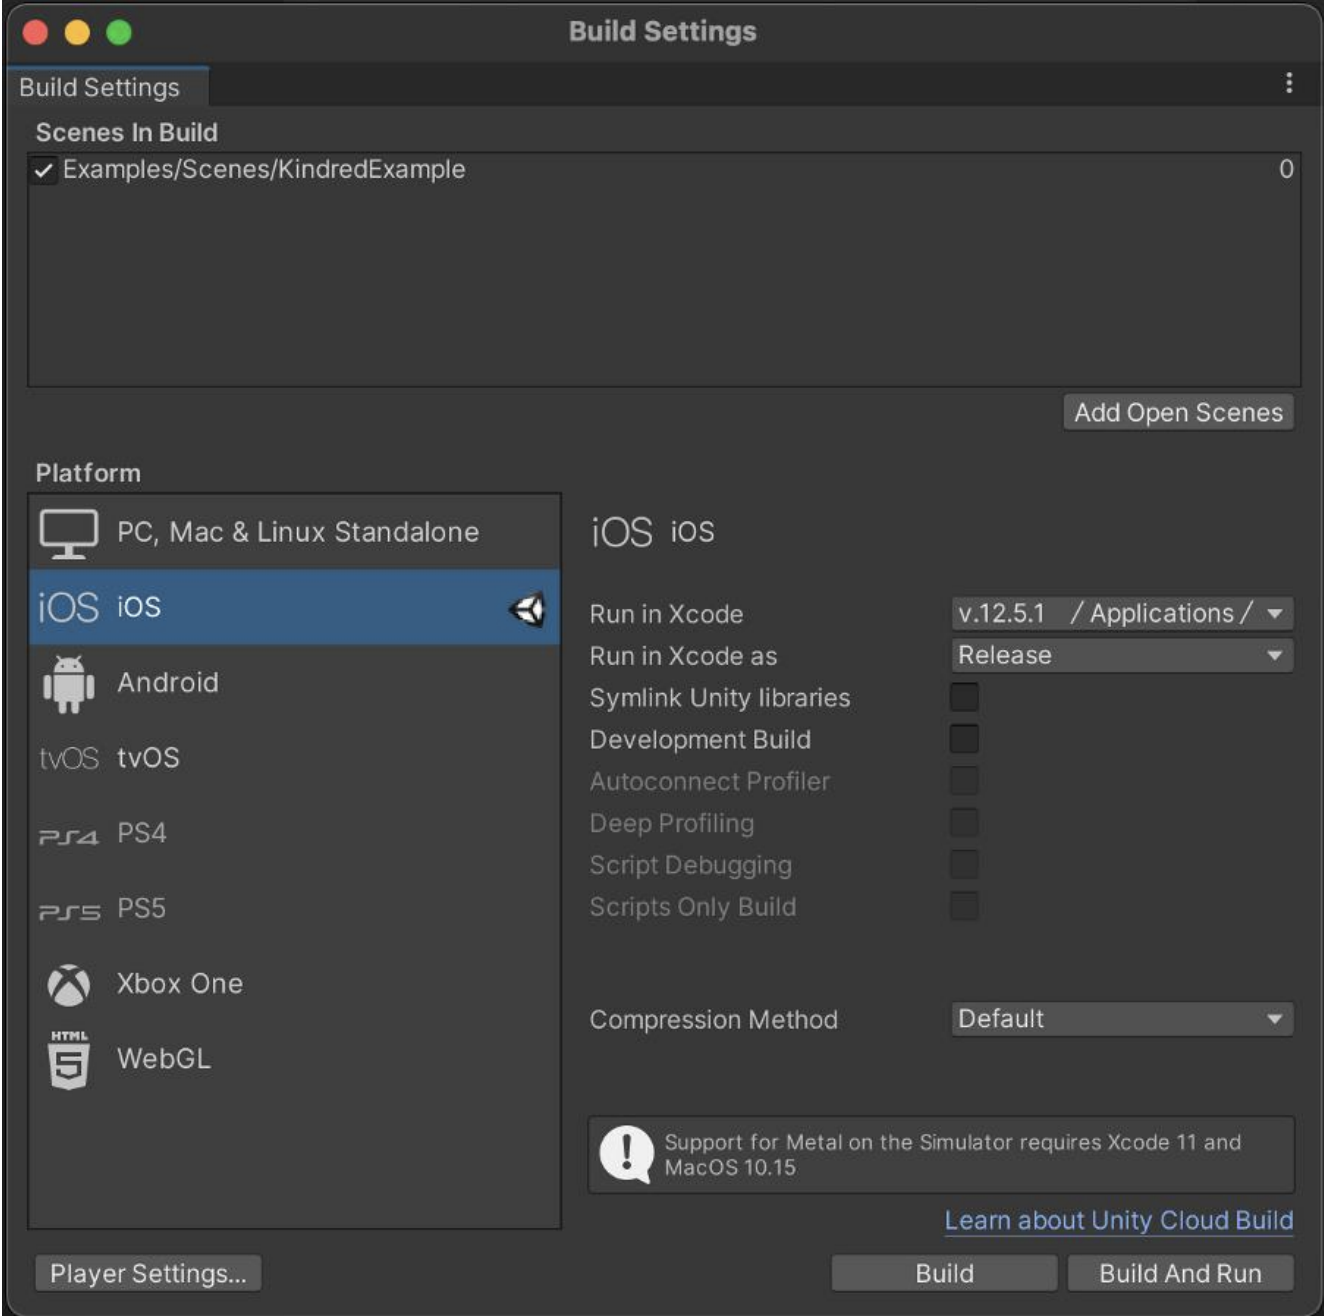
Add the scenes to your build to try them out:
- Go to the Build Settings > Android
- Drag and drop the scenes from KindredSdk/Examples/Scenes
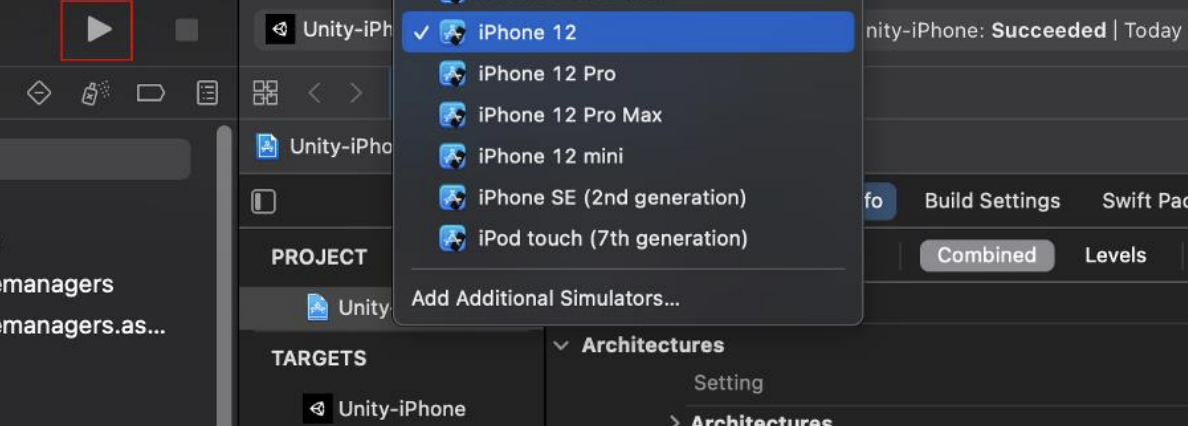
Run on a connected Android device
- Connect your Android Device
- Open the Build Settings and click on Android
- Click on Build and Run
Run on Android Virtual Device
- From Unity, open the Build Settings and click on Android
- Tick the Export Project checkbox
- Click on Export and select destination folder of your choice

- Open the project in Android Studio
- Rebuild the project from Build > Rebuild Project
- Select the Android Virtual Device of your choice and press the play icon to run the project. Make sure your AVD has Play Store available. You can check Play Store installation from the Play Store column on your AVD manager. If you don’t have any AVD with Play Store, you can create a new one by clicking on the Create Virtual Device button and choose one that has a Play Store icon.
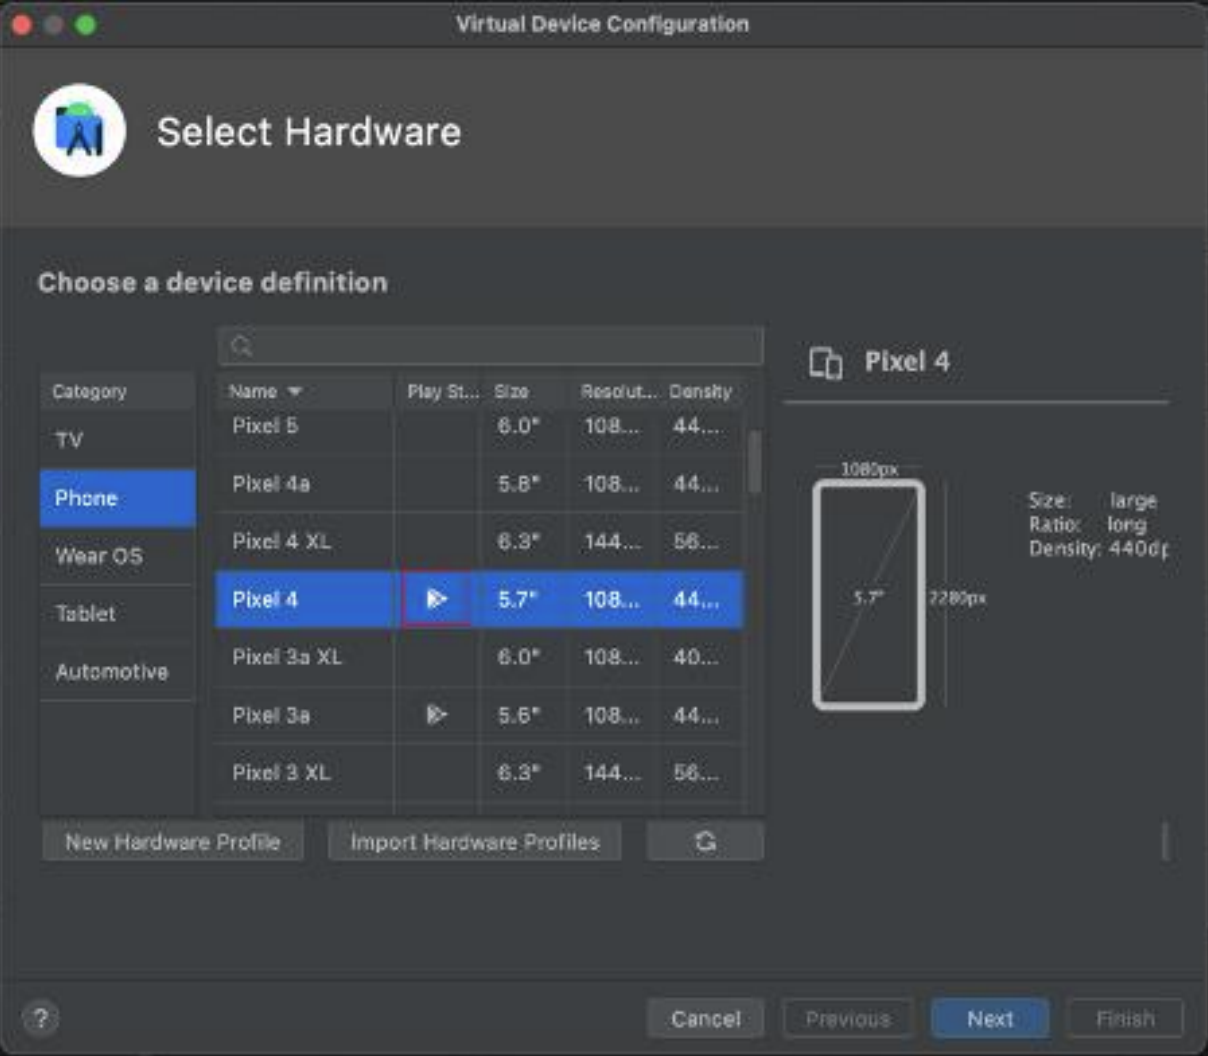
- You’re ready to try out the sample app. For more details on this, please refer to the “Try out the sample app” section.
Prepare the iOS build
- Using the Kindred Setup Wizard, under “Configure iOS”, insert your App Group
Name. - Optionally, you could use TeamId to set your Team ID for signing the Kindred SDK extension. Use the Apple developer site to find your Team ID.
- Click on “Prepare iOS Build”. If you get a yellow warning “please switch your platform
to iOS to prepare the iOS build”, go to the Build Settings > iOS and click Switch
Platform. Then close the build settings and go back to the Kindred Setup Wizard.
Run on a connected iOS device
- Connect your iOS device
- Open the Build Settings and click on iOS
- If you haven’t done this yet, drag and drop the scenes from
KindredSdk/Examples/Scenes into the Scenes in “Build section”
Please refer to the Scene’s Selection paragraph above for more details on the sample
scenes. - Select Switch Platform if needed
- Select Install Unity Hub if needed
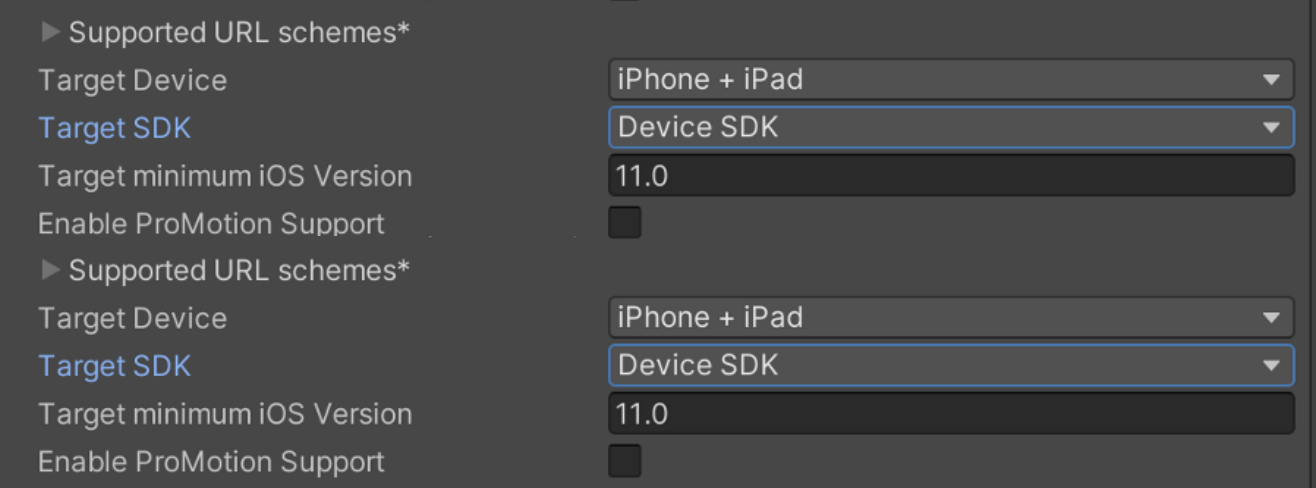
- Open the Player Settings
- From the “Player” section, change Target SDK to Device SDK
- Select Build to export your project
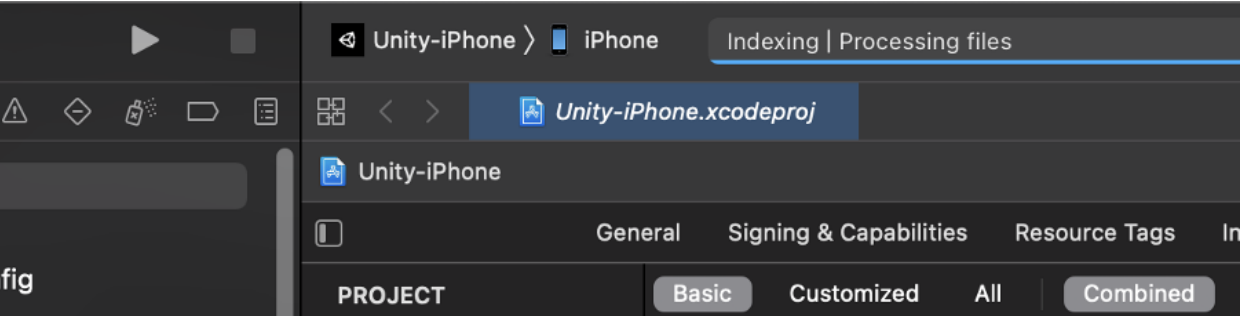
- Open the exported project in Xcode
- Choose your connected device from the top menu and click the play button
Run on iOS Simulator
- From Unity, open the Build Settings and click on iOS
- If you haven’t done this yet, drag and drop the scenes from KindredSdk/Examples/Scenes into the Scenes in “Build section”. Please refer to the Scene’s Selection paragraph above for more details on the sample scenes.
- Select Switch Platform if needed
- Select Install Unity Hub if needed
- Open the Player Settings
- From the “Player” section, change Target SDK to Simulator SDK
- Select “Build” to export your project
- Open the exported project in XCode
- Choose a simulator from the top menu and click the play button
Try out the sample scenes
Once the app is up and running on your Android/iOS simulator or device, you can try out our sample scenes.
The sample scenes will allow you to look at the SDK integration and try out the
browser extension before getting your hands on code. They act like a tutorial for helping you understanding what it is required for your Unity integration and showcase the use of the browser extension. We will guide you on how to programmatically send this piece of datafrom your mobile game to the Kindred SDK using the KindredSdkBridge on the Setting the user at runtime section.
Once you open the app, you will be asked to enter user’s data. You can use anything you’d like at this stage.
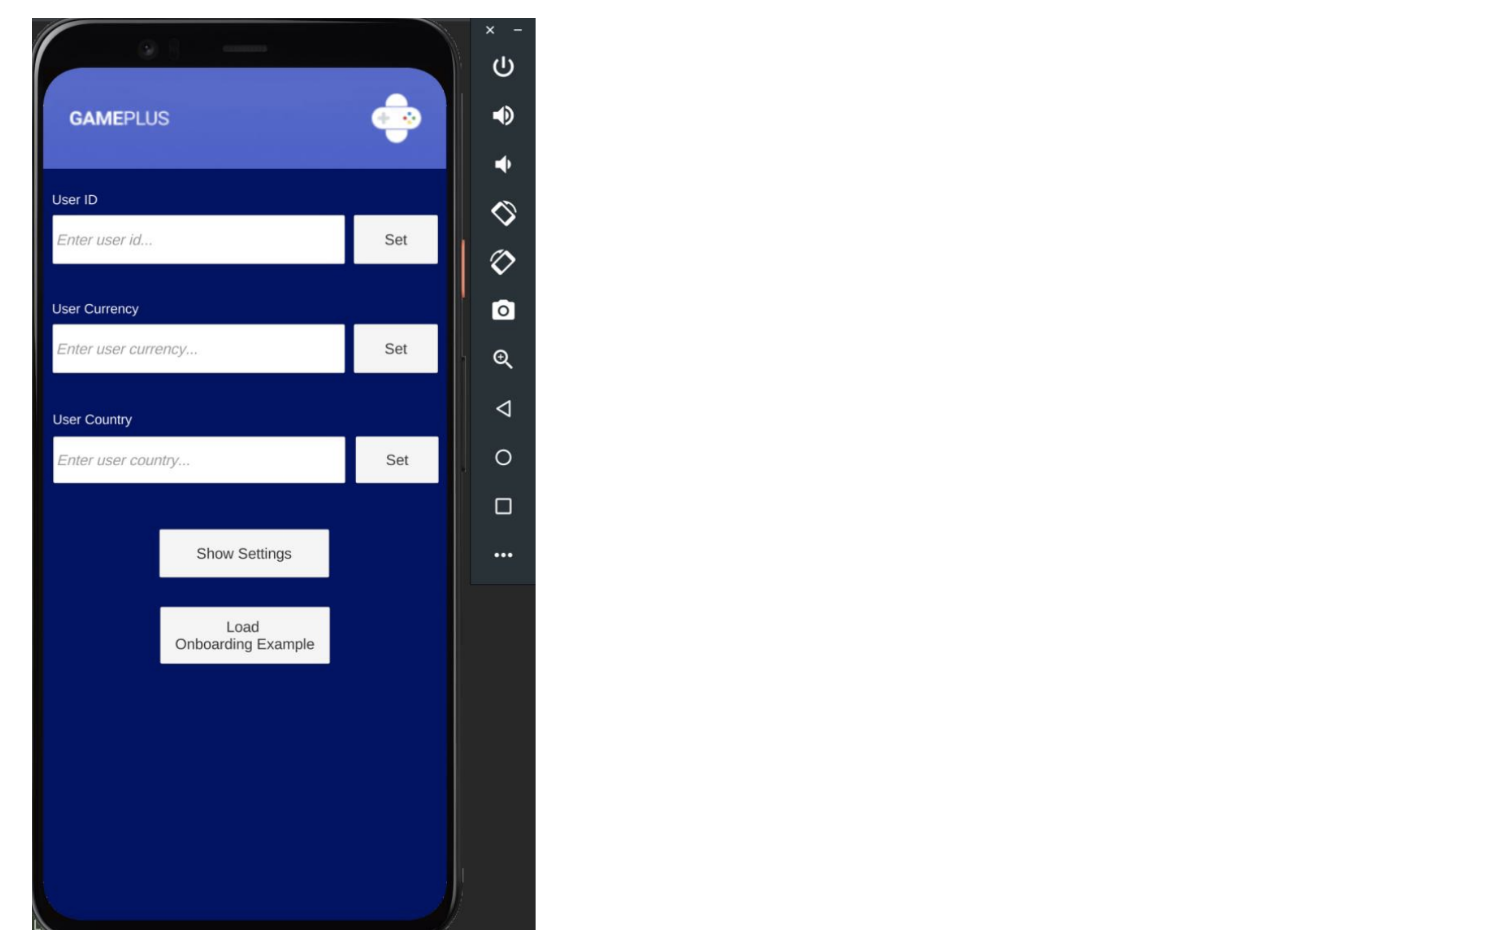
• User id (string)
The id of your player. This is needed so we can associate your player to clicks and
conversions. Default value is a randomly generated id.
• User currency (string)
The currency of your player (if available). This is needed so we can associate the correct currency to the conversions. Currency must be specified following ISO 4217 Alpha-3 code format. (i.e., “USD”). Default value is “USD”.
• User country (string)
The country of your player (if available). This is needed so we can show your players only deals that are relevant to their country. Country must be specified following the ISO 31661- Alpha-2 code format. (i.e., “US”). Default value is phone’s local region.
- Enter a user id and click Set. It can be any string at this stage.
- Enter a user currency and click Set. Ensure you use a 3-code format e.g., USD
- Enter a user country and click Set. Ensure you use a 2-code format e.g., US
- Click on Show Settings. You can enable or disable the Auto Deals Activation feature. When this feature is enabled, deals will be automatically activated for your users by default.
- Click on Load Onboarding Example. This will show you a sample onboarding scene. We will give you a few ideas for your own activation instructions during onboarding in the next sections.
- From the onboarding scene sample, click on “enable” (Android) or “activate” (iOS) and follow the steps to enable the service.
- Open Chrome (for Android) or Safari (for iOS) and navigate to the website of a brand of your choice e.g., https://nike.com
- If there’s an active deal for the brand, a popup indicating there is a deal available should appear at the bottom. You can activate the deal by clicking on the Activate deal button.
- That’s it! This is how you will start earning commission from the online purchases made by your players, outside of the game play.
Setting the user at runtime
User id, user currency and user country should be set by your game at runtime.
Setting user’s data is highly recommended if you wish to attribute clicks and
conversions to your players and be able to reward them. We recommend you set the user id, country, and currency whenever these are initialized or updated within your source code.
If you decide to not set this data from your app, we will use default values instead. However, you will not be able to attribute clicks and conversions to your players and reward them. Rewarding your users is a recommended step to increase users’ retention and drive more revenue.
You should set the user id, user country, user currency and app URL scheme by calling the functions defined on the KindredSdkBridge class from your Unity project.
You can use our prefab as a starting point.
- From the navigation bar, click Kindred > Setup Scene
- This will create a new scene InitKindred.cs
- The InitKindred script shows how you can initialize the Kindred SDK by setting the user’s data and the URL scheme. You can change this according to your own needs./

KindredSdkBridge Methods
The KindredSdkBridge is a static class that exposes all the methods you need to set the user’s data and the app URL scheme at runtime.
• SetUserId
Static method to set the user’s ID. The browser extension uses the user’s ID to
attribute clicks and conversions to your player.
Params: userId (string)
• SetUserCurrency
Static method to set the user’s currency. The browser extension uses the user’s
currency for the conversions.
Params: currency (string) - must be specified following ISO 4217 Alpha-3 code (e.g., “USD”)
• SetUserCountry
Static method to set the user’s country. The browser extension uses the user’s country to show only deals that are applicable to the user.
Params: country (string) – must be specified following ISO 31661- Alpha-2 code
format. (e.g., “US”)
• SetAppUrlScheme (for iOS only)
Static method to set the App URL Scheme. Set this URL to redirect iOS users back to
the app from the browser extension’s popup they receive once they activate a deal
and make a purchase.
Params: url (string)
• IsAccessibilityServiceEnabled (for Android only)
Static method to get the extension status. See KindredExample.cs for the sample implementation.
• IsExtensionFirstTimeInstall (for iOS only)
Static method to get the extension first time installation status. See KindredExample.cs for the sample implementation.
⚙️ API Integration
Once the Unity integration is complete and you publish your app to the stores, you will start earning commissions from purchases made by your players as they shop online.
You can also choose to reward your users by integrating with our API. You can decide to convert commission earned by your players into in-game rewards, game points, tokens, etc. You can choose the best strategy to reward your usersaccording to your own needs. This is entirely up to you!
Generate your API credentials
The API credentials are made up of:
- Client id
Guid used to identify your credentials - Client secret
String we use to validate your credentials - Client secondary secret
String you can use if you ever need to reset your credentials to avoid downtime on your client app (Find out more on the _Resetting your secret _section)
You can generate the API credentials through our SDK Portal.
- Navigate to https://sdk-portal.kindred.co
- Log in or Register. If you have already followed the steps to Generate the SDK Credentials for Unity, you must use the same email and password you have used before and log into the portal rather than registering again.
- From the left-hand side menu, click on Credentials
- Under the API Credentials section, click on Generate.
- For security reasons, client secrets will be shown only once upon creation. Please store them safely before closing the tab or refreshing the page. Once you close the tab, they won’t appear again.
Try out the Kindred API
- Navigate to https://api-partners.kindred.co/partners/public/docs/index.html
- Click on the Authorize button
- Insert your client id
- Insert your client secre. If your client secret contains special charaters, you might need to
encode it before pasting it on the client_secret field. - Tick the partners-public checkbox
- Click on Authorize
- Try the available endpoints. E.g., the Conversions endpoint is the one you will need to reward your users through converting the commission they have earned while shopping online.
For more details on the Kindred API, you can visit the API Guide documentation
https://kindredsdkdocs.readme.io/docs/kindred-public-api-docs
Tips for integrating with the Kindred API
Implementing a weekly job that pulls approved conversions for all users who have activated the browser extension is the recommended strategy to pay out your users. However, you can choose the most appropriate technology depending on your own requirements.
If unsure, feel free to get in touch with us for a free technical consultation.
Most integrations will follow the below steps:
- Implement API Authentication. The authentication mechanism follows OAuth2 client credentials flow. The auth token expires after 1 hour.

- Get a list of all users who have activated the browser extension. To do so, you can query the /partners/public/users GET endpoint. All users returned by this endpoint have installed and activated the browser extension. The user id is the one you specify from your Unity game when setting the user at runtime.
- For each user, get the earned commission. To do so, you can query the
/partners/public/conversions GET endpoint (filtering by the user ids returned from the Users endpoint).
Each conversion has “commissionAmount” and “commissionCurrency” field
available. These refer to the commission earned by your user for purchases made through the browser extension. The “partnerAmount” and “partnerCurrency” fields refer to the portion of commission you earned from the purchase made by the user. Additionally, each conversion has a status; pending, approved, and rejected. Pending indicates that we have received acknowledgment that the user has made a purchase after activating a deal. A conversion is approved after validating the purchase, and the merchant confirming no products have been returned and verifying that the earned commission is legit or rejected otherwise. - Use conversions data to convert commissions earned by the users into in-game rewards, game tokens or points etc using your own internal conversion process.
👉 Get your players to activate the mobile extension
To start earning from the extension, you must make sure your players know how to enable it. We have a few suggestions for you. Please feel free to choose the strategy that is most appropriate for your app.
Activating the feature on iOS
Another great way to let your users know about the extension and how to activate it is to show them a few instructions during onboarding.
For iOS, we have created an instructions page to let users know how to activate the extension. This can be found at https://sdk.kindred.co/plugin-activation. To replicate the user experience on iOS, this link is only available on Safari mobile. Please make sure you test it from an iOS device on Safari.
If you would like to make use of our callback that redirects the user back to your app once they're done activating the plugin, you can pass the “origin” and “utm_campaign” query params with the value of the URL scheme of your app.
https://sdk.kindred.co/plugin-activation?origin=YOUR_URL_SCHEME&utm_content=en-GB
For example, if your URL scheme is Kindred:// then you will use the link https://sdk.kindred.co/plugin-activation?origin=kindred&utm_campaign=kindred
To learn more about URL scheme, please visit: https://developer.apple.com/documentation/xcode/defining-a-custom-url-scheme-for-your-app
Activating the feature on Android
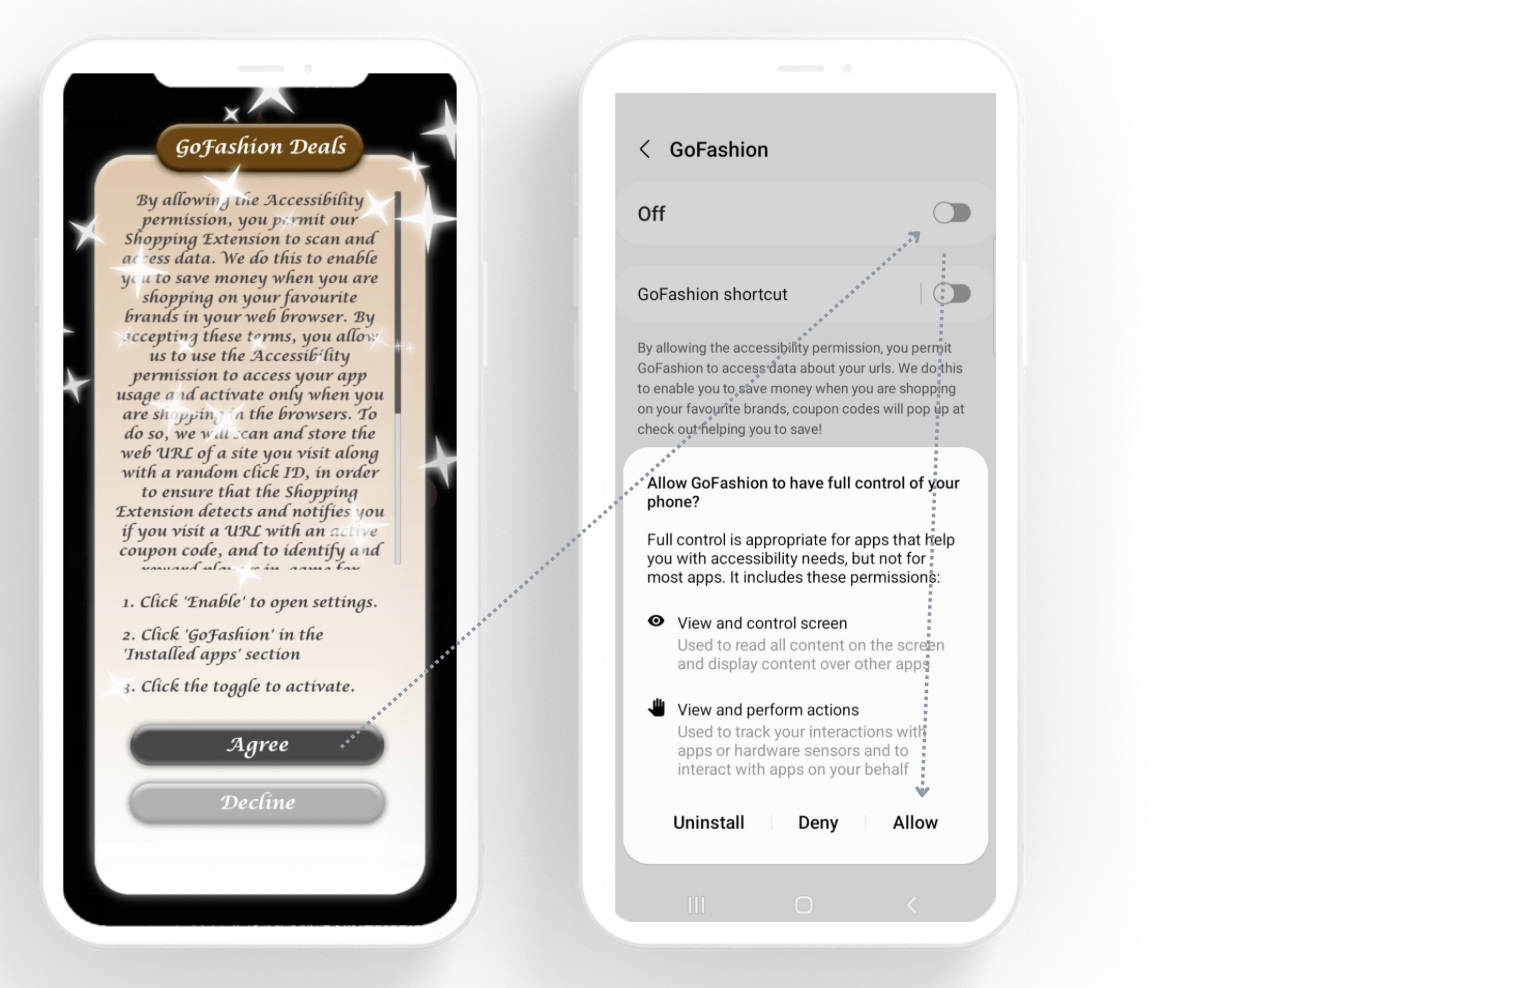
The way that your users activate the feature on android is slightly different than on iOS. Rather than turning on the feature in their browser, the players, turn on the feature in the settings on their device.
As part of integrating with Kindred is essential that you have the instructions available to your Android users, explaining how to turn on the feature. See the example below. The steps are:
- Click the button to open settings
- Click installed apps and find “name of your game”
- Click on the toggle to turn on the extension and allow permissions.
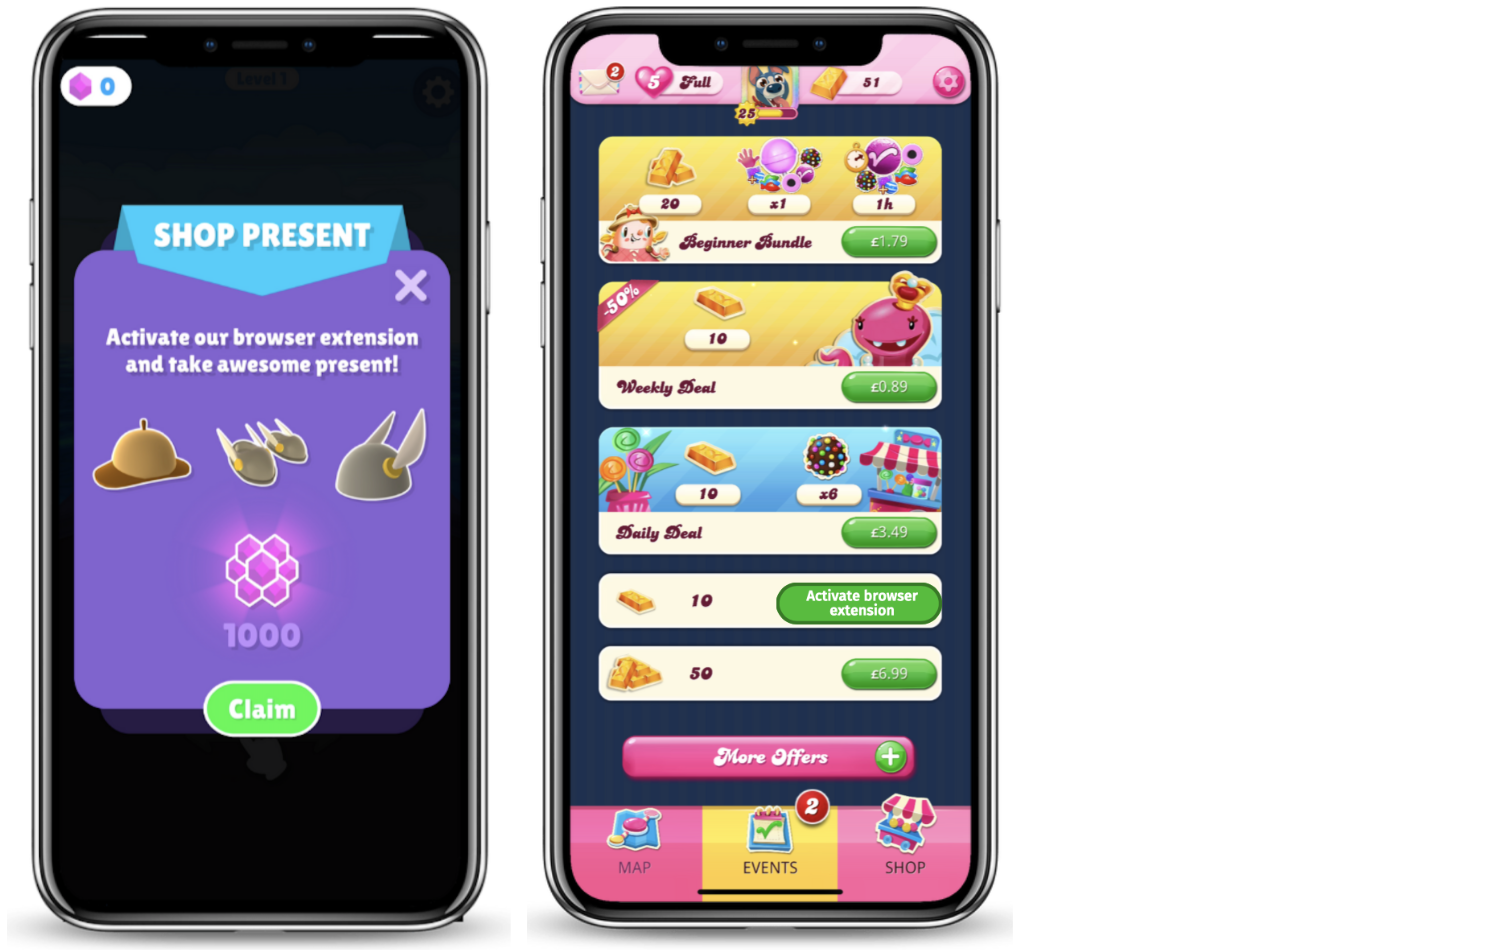
This first screenshot shows an example of how to present these instructions to your users. The second shows how they would turn on the extension in settings. The final one shows the user accepting permissions of the extension (standard pop up for adding a feature like this).
Add Call to Actions (CTA)
CTAs are a great way to let your users know about the new feature and how to use it.
Depends on the OS the CTAs will take the user to their browser (iOS) or to see the instructions on how to activate (android).
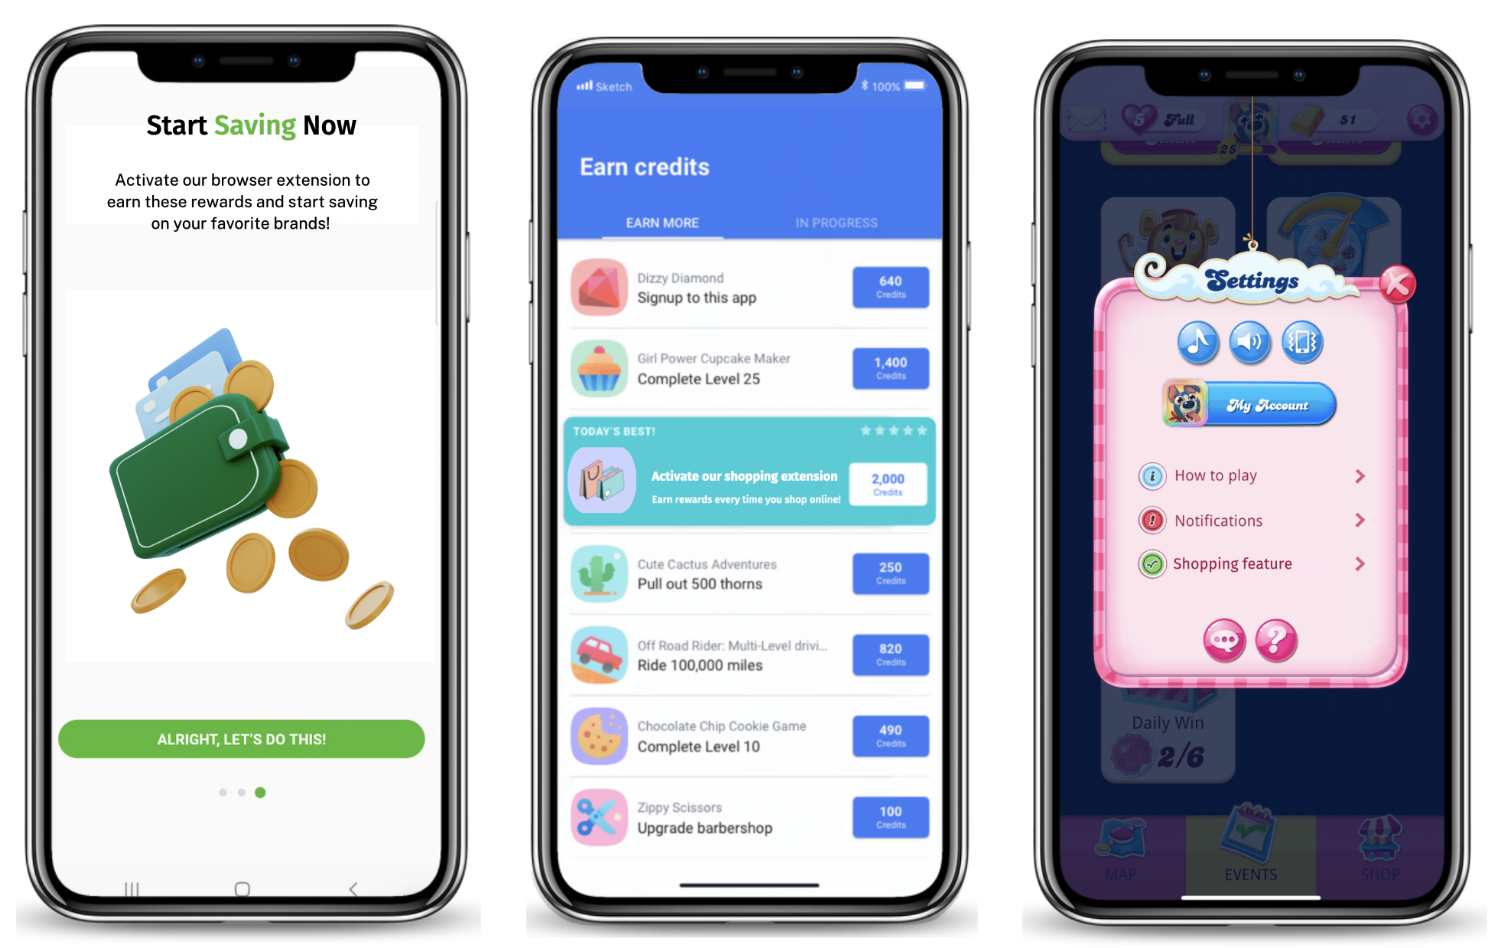
• CTA as part of the onboarding journey for new players E.g., where you must create an account or select an avatar (if you have these features).
• CTA in offer wall E.g., if you have an offer wall in your game, one option to earn in game rewards could be to activate this feature.
• CTA in settings area E.g., new area in settings for browser.
• CTA in pop up E.g., at the end of a level or a reminder.
• CTA in shop – if your game has a shop, you can add a CTA here.
Use push notifications
Push notifications are also another great way to let your users know about the extension.
For example, you can send a push notification to your users “Check out our new extension to start earning more in game rewards today” and redirect the user to the activation page once the user clicks on the notification.
Community Chest
As motivation to get your CTAs just right, we provide a community chest to studios who have added great, clear CTAs. This is a sum of money in the form of an Amazon voucher that can be given to your players, in a competition. For example, if they activate the extension, they will be entered to win $100 worth of Amazon Vouchers.
This will help to increase the number of players that activate the feature.
The amount up for grabs varies dependent on the size of your game.
| No. of MAU | Amazon Vouchers |
|---|---|
| 10K-50K | $100 |
| 51K-250K | $250 |
| 251K-500K | $400 |
| 500K-1M | $500 |
| 1M+ | $750 |
To access this community chest – email Holly Bartlett at [email protected]
For more ideas on how to increase player adoption of the extension – check out our marketing pack.
ℹ️ Tips for smooth submission to the Google Play Console
The Android browser extension you have integrated within your Unity game uses a feature called Accessibility Service. Google requires apps that use the accessibility service to declare what they’re using it for. You will be required to complete the Permissions Declaration form during the Android release process.
To break it down into four steps:
1. Create a prominent disclosure pop-up
Make sure that you have included a prominent disclosure pop-up in your game, which explains the SDK’s data usage to players. This can be combined with the activation CTA, explaining the feature and providing instructions for activation, as seen here.
The activation CTA should include the steps of activation:
- Click “Agree”to open Settings.
- Click “App Name”in the “Installed Apps”section.
- Click the toggle activate.
- Start receiving coupons!
The text in this permissions pop-up needs to meet all requirements detailed here: https://support.google.com/googleplay/android-developer/answer/11150561.
- Explain the core purpose of extension
- Disclose all types of data involved when using this capability
- Describewhy the data is needed, and that it is shared with a third party, and why this is necessary(include a value-add for the user)
- Clarity > brevity
- Easy enough for a 13-year-oldto comprehend, avoidthe use ofjargon
- Use ‘Agree,’‘Disagree,’[Optional: ‘Skipfor now’]rather than ‘OK,’‘Accept,’or ‘Got it’on the buttons
Our example text(feel free to copy and paste this):
By allowing the Accessibility permission, you permit ourShopping Extensionto scan and access data. We do this to enable you to save money when you are shopping on your favourite brands in your web browser. By accepting these terms, you allow us to use the Accessibility permission to access your app usage and activate only when you are shopping in the browsers. To do so, we will scan and store the web URL of a site you visit along with a random click ID, in order to ensure that theShopping Extensiondetects and notifies you if you visit a URL with an active coupon code, and to identify and reward players in-game for purchasesmade in your mobile browser for the app'sShopping Extensionfeature. The Accessibility permission will display graphics allowing you to copy coupon codes and check out rewards. In addition, our app shares your locale and domains of of websites that you visit with a third party in order to retrieve and display coupons and offers when applicable for the app'sShopping Extensionfeature.
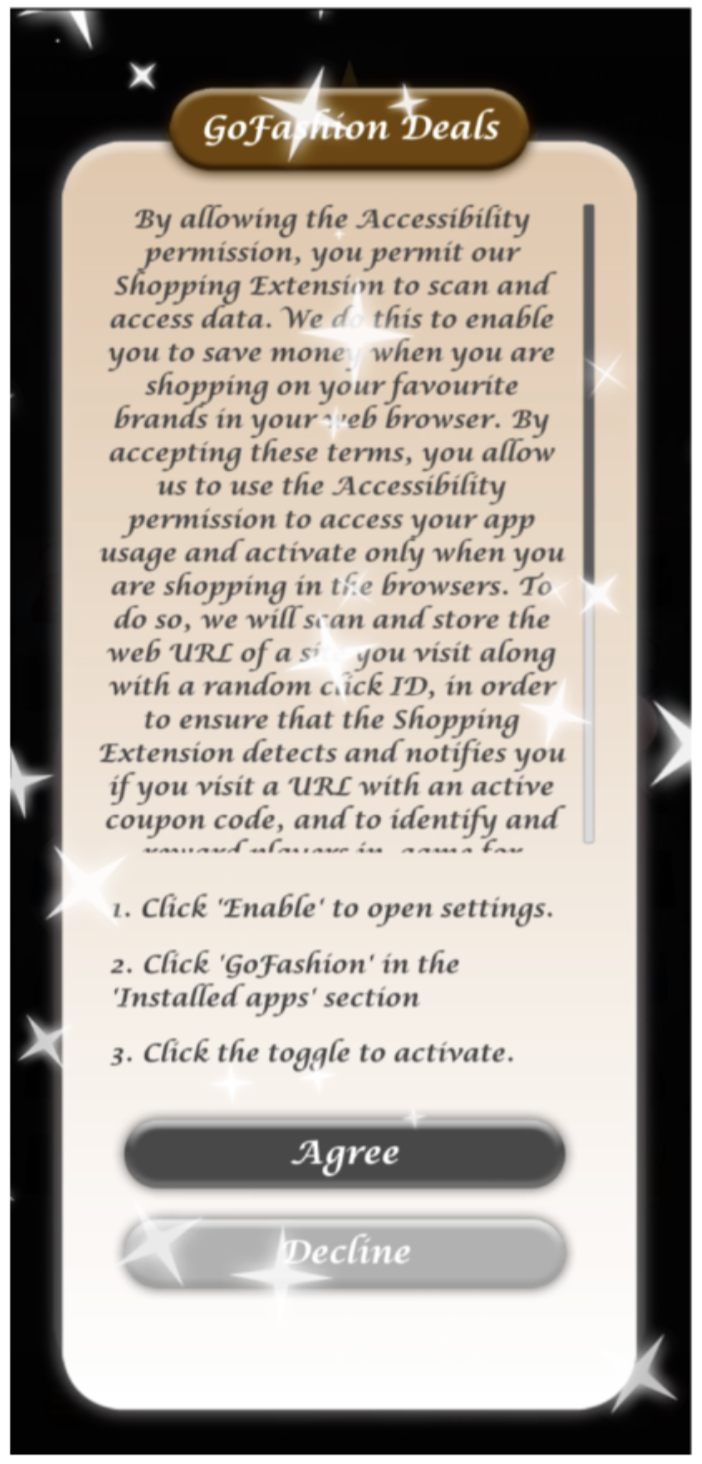
Permissions Pop-up Example Screenshot
2. Update your app store listing’s description
- Navigate to the Google Play Console and log in using your account
- From the dashboard, click on your App
- From the left-hand side panel, click on Main Store Listing
- Update your app description to reflect the use of the Android Accessibility Service
e.g. “App Name” provides its players with shopping discounts by using Accessibility permissions to access the URL of brands’ websites in their browsers with available coupon codes offered. By using the Accessibility API, players are also rewarded with in-app coins for using this feature.**
italicisedphrase can be added or removed based on how you have integrated Kindred’s SDK and API
3. Update the text in Settings
Change thecontent of the file on this path:
Assets/KindredSdk/Editor/Templates/Android/strings.txtas

e.g. By allowing the Accessibility Permission, you permit “App Name”to access data about your URLs. We do this to enable you to save money when you are shopping onyour favourite brands, couponcodes will pop up at checkout, helping you to save!
4. Permissions Declaration Form
You will be asked to fill in this form from the “Review Release” section on the Play Store.
Official Google documentation is here: https://support.google.com/googleplay/android-developer/answer/10964491?hl=en
-
From your Google Play Console, click on “Testing > Internal Testing” from the left-hand
side menu. Then, click on “edit release” -
You may find an error as shown on the below picture
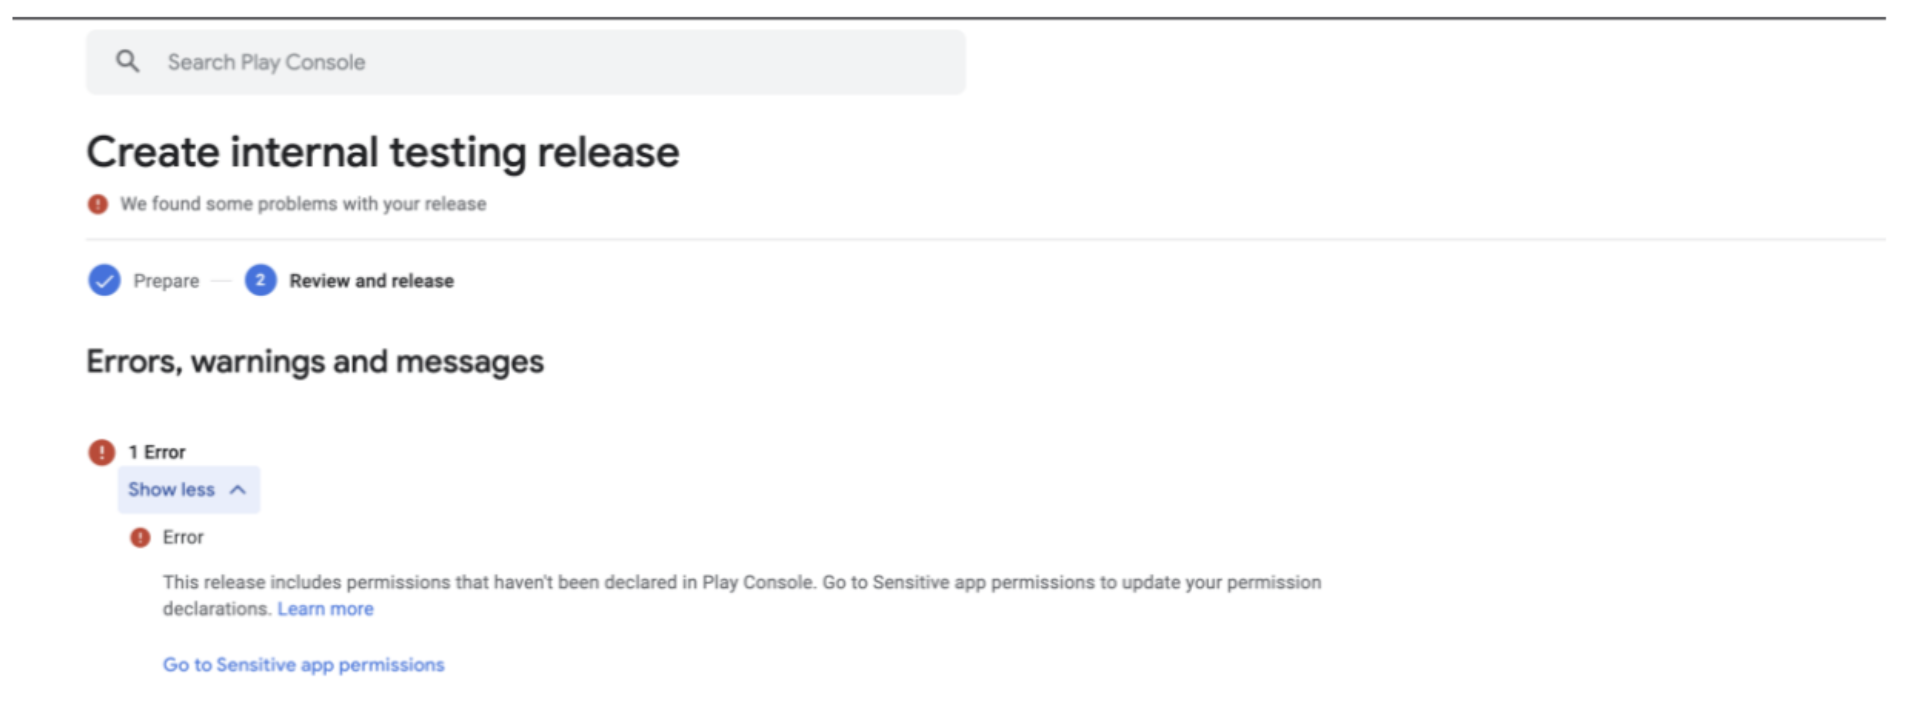
- Click on Go to Sensitive app permissions
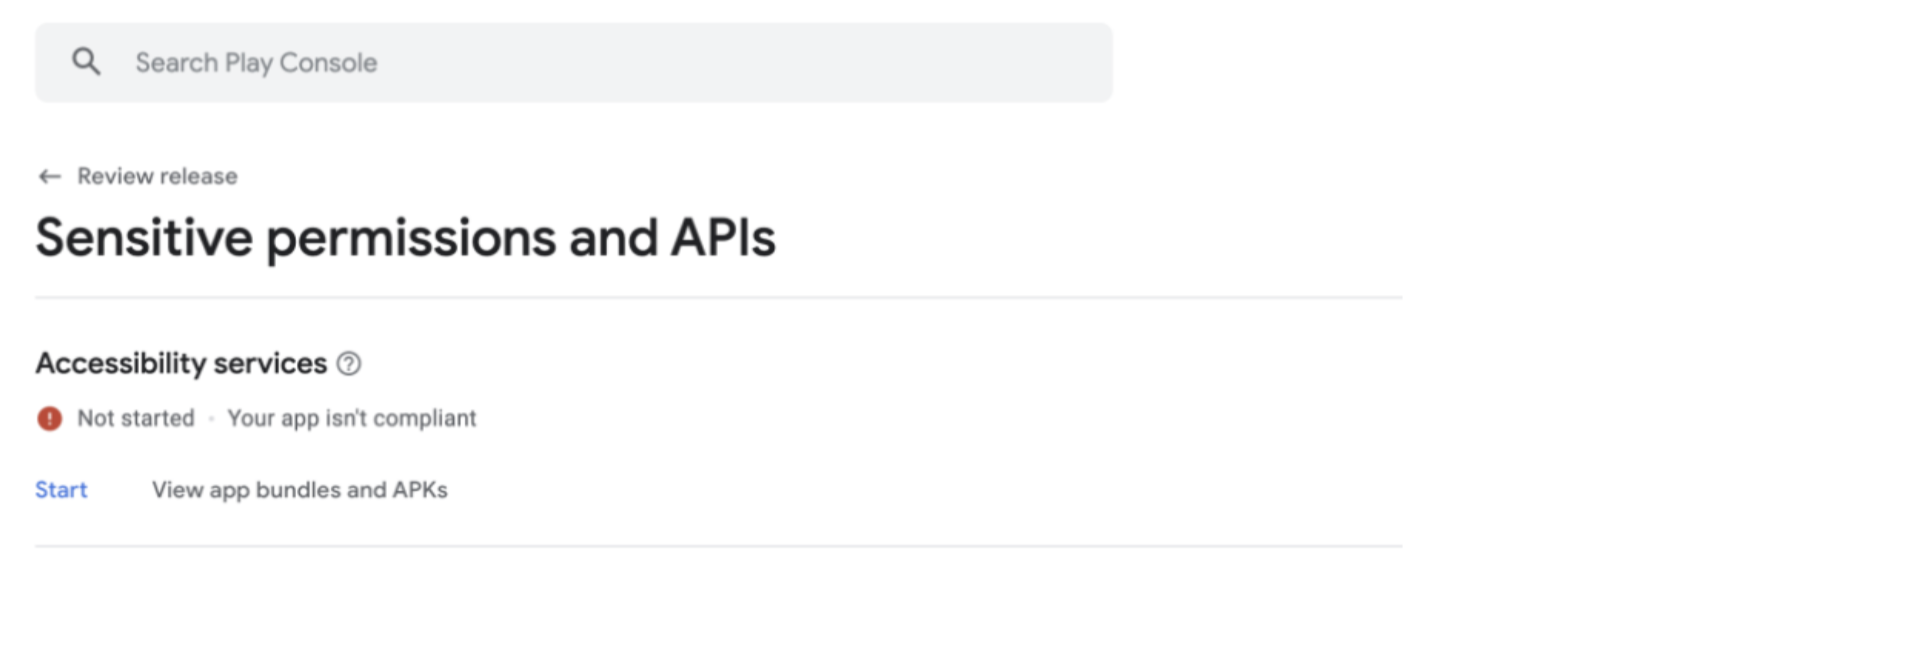
- Click on Start
- Fill in the Form as shown below
To make life easy for you, we have provided the correct answers to the Policy Declaration form here:
- Why does your app need to use the Accessibility Services API?
App Functionality - Do you collect and/or share personal or sensitive data using the accessibility
capabilities?
Yes - What user data do you collect and/or share using the Accessibility Services API?
App Activity -> Installed apps
Web browsing -> Web browsing history
Device or other IDs -> Device or other identifiers - To help us review your app, provide a link to a short video which shows the prominent
disclosure shown to users in your app.
Reach out to us at[email protected] to make this video for you. Or, follow the instructions below if you want to do it yourself.
The video that you provide as part of the declaration must include the following:
- The opening of your app on the device. [i.e. screen recording]
- The user flows to get to the prominent disclosure pop-up and consent screen for
Accessibility.
- Make sure that the video includes the full prominent disclosure text. If it requires scrolling, make sure that you slowly scroll so that all text is legible in the video.
- In-app prominent disclosure cannot be substituted with AccessibilityService_description or AccessibilityService_htmlDescription
- The user flow when the user consents, including granting your app the
accessibility permission in settings. Then return to the app.
- Show the shopping journey in browser after activation.
- The user flow when the user does not consent, including the process when the
user triggers the prominent disclosure and consent screen again. [i.e. show the user declining in app, then accepting in app but declining in settings] - A core feature in your app that uses the accessibility capabilities. If it isn't obvious from the user interface how accessibility services are being used in your app, provide a voice-over or captions to help explain.
- Show the shopping journey in browser without pop-ups after not consenting.
🔄 Reset your secrets
If you have lost your SDK or API client secret, you can re-generate it through the SDK Portal.
Reset the client secret
Before resetting, we highly recommend you first replace the client secrets with the secondary client secret and re-deploy your applications. This will help you avoiding downtime of your applications.
- Replace the client secret with your secondary client secret on your applications
- Re-deploy your Unity game or the service integrated with our API
- Navigate to https://sdk-portal.kindred.co/credentials
- Log in
- Click on Credentials from the left-hand side menu
- Click on Reset Primary Secret
- Store the new client secret securely
- Replace the client secret with the new primary secret on your Unity Game or service integrated with our API
- Re-deploy your Unity game or the service
Reset the secondary client secret
- Ensure you are not currently using the secondary client secret on any of your applications
- Navigate to https://sdk-portal.kindred.co/credentials
- Log in
- Click on Credentials from the left-hand side menu
- Click on Reset Secondary Secret
- Store the new client secret securely
💬 How can we help?
We are always happy to help and support you throughout the integration process.
If you are having any issues or concerns, or if you got stuck on a specific step, please do not hesitate to get in touch with us. We will make sure appropriate technical support is given for any issues.
You can get in touch with us by emailing our support at [email protected] or Holly Bartlett at [email protected]
🙋 FAQs
- Why do I have to set the user’s ID?
The user’s ID is used to attribute clicks and conversions to your players. Although setting the user’s ID is not a mandatory step, we highly recommend you do this using the KindredSdkBridge methods from the Kindred Unit Asset.
If you don’t set the user’s ID from your Unity game, you will not be able to reward
your players for the deals they have activated through the browser extension.
- Why do I have to set the user’s country?
The browser extension uses this information to ensure only deals that are applicable to the user’s country are shown.
Setting the user’s country is not a mandatory step. If you don’t set the user’s country, we will use the user’s phone locale.
- Why do I have to set the user’s currency?
The browser extension uses this information to ensure conversions are created in the specified currency.
Setting the user’s currency is not a mandatory step. If you don’t set the user’s currency, we will default to USD.
- Why do I have to set the app URL scheme for iOS?
The browser extension uses this URL to redirect users back to the app from the notification they receive once they activate a deal and make a purchase. Setting the app scheme URL is not a mandatory step, but it is highly recommended you do so for your iOS app.
If you don’t set the app URL scheme, users will not be redirected back to the app from the popup.
- How do I know when a user has activated the browser extension?
As soon as the user activates the browser extension from the phone’s settings, a user entity is created within our system. If you have set the user ID using the KindredSdkBridge method “SetUserId”, the user will be associated to the ID you’ve specified. Otherwise, the user will be associated to a randomly generated user id.
If you need to retrieve users who have activated the browser extension, you can use the /partners/public/users endpoint from the Kindred API.
- How do I know how much users are earning through the browser extension?
You can use the /partners/public/conversions GET endpoint from the Kindred API to retrieve information about your users’ earnings.
- How do I reward users for activating the browser extension?
Rewarding your users for activating the browser extension can be a very effective strategy for encouraging your players to use the new feature. Our latest SDK 2.0.0 enables this feature.
- What is a complete user journey like?
To see the User Journey on iOS, watch this video
To see the User Journey on Android, watch this video